


gerg
-
Content Count
9,904 -
Joined
-
Last visited
-
Days Won
108
Reputation Activity
-

 gerg reacted to damo9999 in sohc into xf
well i have just ordered the plug and play microsquirt from efi source $475usd + post, https://www.efisource.com/wp/shop/microsquirt-for-1986-93-ford-5-0-mustang/ just over $850aud for a fully programable computer i have used them before on a 2.7 litre kombi and a ls1 turbo , and they work great for the money . they are an entry level system ,but still have a lot for the money .... the one i got is for the 86 fox body mustang , same 60 pin plug as our falcons , and 98% the same pinouts as our falcon , the changes for it to work are...[from efi source ]..............
here are the minimum changes that I can see that would be required:
- Make sure the unused pins 12-15 and 42 are indeed not populated with wires (these are all additional injector channels on the Mustangs)
- As this is an off-road use only ECU, it will not control any emissions equipment like the EGR/vent/purge solenoids. Most of these pins are disconnected it the ECU, however there are a few used for other intended functions that might give you conflicts:
- Pin 31 is a PWM output intended for a boost controller output
- Pin 52 is meant for another injector output
- Pin 43 is meant for one of the factory narrow band O2 sensor inputs...........All of the other important things seem to be the same though - ignition, crank signal, idle valve, sensors, grounds, etc. .............. to run the btr i will be using a shift kits manual control for now ,,, then I will get another microsquirt to control the btr latter on ...... the easy thing with this setup is i can use canbus between both computers........ this will all go in when i turbo charge it early next year . i will run it naturally aspirated first .
-
 gerg got a reaction from Thom in cleveland T5 conversion using single rail bellhousing (step by step)
Nice write-up... It's uncanny how similar your swap is to mine, with the following differences:
* My engine's a mild 302C
* I used a Toploader bellhousing and made up a slave cylinder mounting bracket (it was for an F-truck mechanical clutch with no slave).
* I filled the old bolt holes with cut off bolts and silver soldered them in, and the top T5 mount bolts are M12 wheel studs soldered into the bellhousing. Bottom ones are just drilled and tapped. The mount face on a toploader bell extends far enough down for the standard T5 lower bolts to meet, hence the reason for choosing the toploader one.
* I originally had 3.27 gears (from an XG ute) but went over to 3.08s when I redid my diff. It sits on about 2000 doing 90. The T5 is from my old EA so 5th is 0.78 and 1st is 3.50. like you said, it's a bit short but on the plus side, doesn't need too much clutch slip to get going.
* I used an EL wagon alloy tailshaft as it's the right length and was 30 bucks.
* I eventually went to a 3/4" trailer-type master cylinder and a Jaguar 7/8” slave, the master previously swapped because I'd already chewed out 3 of the standard 5/8” ones and got sick of being stranded. You can pick up a trailer master cylinder at any parts store, so I'm covered there. The Jag slave was to get the bore ratios back closer to standard (clutch was very heavy with the 1:1 ratio).
* I'd previously made my shifter into a short-shift by spacing up the pivot plate and extending the ball pivot by the same amount. I also made a new stick out of some water pipe, put some bends in it to point it more toward the driver and solid-mounted it to the lower part, eliminating the slop in the rubber bushes they come with.
* My mileage didn't really change much from the single rail, maybe by 1L/100 km but the biggest change came from doing up a 650 spreadbore pumper for economy. It's an outstanding street carby, it's the 4th one I've had on it and is the best. I'm now getting 15L/100 fairly consistently, with lovely low speed smoothness yet no need for a choke in winter.
I can't say I'm a huge fan of the T5, it's nowhere near as nice to shift as a tight single rail, and the 2-3 shift under power is always baulky and leaves you fumbling.
I have a write-up on my install somewhere on here, starting from about 8 years ago.
Anyway nice work mate, hope it makes a difference for you.
Sent from my CPH2197 using Tapatalk
-
gerg reacted to napolian_was in cleveland T5 conversion using single rail bellhousing (step by step)
so first off why would you do a t5 conversion? for most people its going to be fuel economy and lower RPM cruising and are not likely to be giving this thing a hard time so a t5 should do the job fine, so why convert a single rail bellhousing and not buy a rod shop bellhousing? well last i looked it was going to cost me almost $900 to my door and that's a lot of fuel money my friends. So if your looking to do this conversation you've probably already done some research but if not, you must use a 6 cylinder t5 from an xf or whenever they started using them to an el Falcon, au and onwards will need custom tail shaft and shifter won't line up, can't used v8 bellhousing or gearbox it would be way too much trouble, 6 cylinder t5 is almost identical to the single rail. This is to document my experience with converting from a single rail with a bellhousing that has only been drilled for single rail in an XC falcon with an almost stock cleveland with an EB diff running 3.27 gears currently sitting on about 2800rpm at 100kmph using about 20.5l/per 100km Ok let's get into it, after you've got your bellhousing/gearbox out first thing you'll need to do to your t5 is turn down the input bearing housing about 1.6mm so it'll fit in the hole, if you don't have access to a lathe a machine shop will make very light work of it and won't cost much at all to get done. i had an empty case to help me work out how to go about it. Then that's done fit it back to the gearbox and after you've got straight as you can you can start working out where your going to tap your new holes, the two top t5 mounting holes can be used so do them first use a punch to mark the holes (transfer punch would make this easy) and then drill and tap, I used 12x1.75 bolts that come with my T5. Bolt the gearbox back onto the bellhousing and now you can workout the two bottom mounts, as you can see the bottom t5 mount's are lower then the face of the bellhousing so what I did for the right side is make a mark just above the t5 hole, drilled and tapped it then bolt the gearbox back on and center punched the case from the inside of the bellhousing and then drilled the t5 case, as for the bottom left there is no meat in the bellhousing casting inline with the t5 case so I tapped a hole just beside the case and used a clamp style mount on this side that consists of a spacer that falls just short of the thickness of the case and another plate that overlaps the case making it clamp down when tightened against it, this could also be used on the other side if you don't want to drill the case. So this should have us sorted for mounting the box to the bellhousing now we'll move onto the cross member, measuring from the face of the box there is about 43mm difference between the two so I used part of the EB cross member and welded it to the back of the cross member about 45mm back (you could use a bit of plate or that ever will pick up the mount,plenty of adjustment no need for it to be perfect just needs to be centre) thinking it would be a great idea to use the square hole but it ended up making it very hard to bolt them together it kinda got stuck between the gearbox and the exhaust headers and I couldn't get it low enough due to the exhaust to get the gearbox mount bolt in the hole. so I think if this hole was slotted it would go much easier. So getting the gearbox in the car I bolted the bellhousing on to the engine and made a few attempts to slide the gearbox on, what I ended up doing is cutting the shifter hole in the floor all the way to the back of the hump mine had about an inch of over hang and that had to go so the shifter housing could get high enough, I also found I couldn't have the shifter Bolted to the gearbox and the hole in my shifter hump is too small to out it through the top so I hung it in the hole with a screwdriver and bolted it on the gearbox after it was in the car. And as I said I struggled with getting the cross member on, I almost dropped one of the headers but ended up getting there. So everything else goes on just like the single rail,. The internet said to fill it with a half and half mix of vmx80 and dex3 ATF and it seems to shift nice, I made a gear stick with the same bend and thread as the single rail and used the knob to make it look like nothing's been changed. Final thoughts are, first gear is a bit short but not the end of the world gets off the line nicely, it doesn't have as positive feel when shifting but still alright, down shifts much nicer than the single rail, sits on about 2200rpm at 100 in 5th. Will have some fuel economy numbers after a few hundred k's. Hopefully this helps I've probably missed something but anyway I did my best. rotio's , i'm told the EL box is the best one to get as its a 'world class' and its a bit stronger. EA T5 1st: 3.50:1 2nd: 2.14:1 3rd: 1.39:1 4th: 1.00:1 5th: 0.78:1 EB2-EL T5 (6 cyl) 1st: 3.25:1 2nd: 1.99:1 3rd: 1.29:1 4th: 1.00:1 5th: 0.72:1 -
gerg reacted to Mr Polson in Fuel Consumpiton High
Don't use Bosch. Modern Bosch parts are shit quality, made cheap, and have enormous failure rates. They are nowhere near the company they used to be.
With thermostat, if not on gas check it's the correct "foot" type one - these block the bypass when the engine gets to temp. I think DT18F is the part number off the top of my head. -
 gerg got a reaction from dex in Fuel Consumpiton High
Could be a sooted O2 sensor, you can sometimes revive them by removing and dunking the tip in lemon juice overnight.
Sent from my CPH2197 using Tapatalk
-
gerg reacted to bear351c in Fuel pump - mechanical vs electric?
Yeah, I ran a Carter electric on my 351 for years, had a kill switch in line as an anti theft device, as well. 😁
-
gerg reacted to DannyP in Fuel pump - mechanical vs electric?
Righto thanks gerg... definitely not sold on the electric pump thing. Sounds like more trouble than they’re worth.
Do you mind me asking why you installed one in the first place?
Sent from my iPhone using Tapatalk
-
 gerg got a reaction from DannyP in Fuel pump - mechanical vs electric?
I can vouch 100% for the facet pump thing. I initially mounted mine in the engine bay, but with it having to suck fuel up from the back, plus through a couple of feet of head, it was noisy as fck.
It was basically cavitating and not pumping sufficiently to feed enough fuel. It needed a boat fuel primer bulb inline to initially prime it too. I then moved it into the spare tyre well just above the tank, and that worked and was much quieter, but it was a pain if I had to get access to it (it started screwing up by then). It would get going again with a smack, but it was getting quite hot.
I finally mounted it below the passenger floor, just where there's a hose junction between the steel pipes. It's audible with engine off, but being low-mounted, it's always being gravity-fed.
The genuine Facet pump finally shit itself spectacularly on the way to the beach, and I gave up trying to pull it down and keep it alive after 3 times it had stopped. I Uber-ed it (with my kids) to an Auto One where I got a chinese-made Goss unit for 50 bucks.l, fitted it on the side of the road, and continued to the beach.
I then read up about these Facet pumps and there seems to have been a bad batch 5-10 years ago, which sucks because I deliberately went with a more expensive US made unit and dodged the Chinese versions, just for the reliability.
The Goss has been going fine for a couple of years now, much better than the "US-made" Facet. It's still mounted under the passenger footwell. At 50 bucks (probably more now though), I might just buy a spare to keep in the car.
Re: the steel tubing for fuel line... I suspect that not only is it more durable, but probably cheaper to make and less clamping is needed to mount it under the chassis.
Sent from my CPH2197 using Tapatalk
-
gerg reacted to bear351c in Fuel pump - mechanical vs electric?
Usually all fuel line is 90% hard tube. It stops the damage from tools, rocks, weather etc... You NEED a definite rubber connection because the engine rocks back and forth, and the chassis doesn't. There's typically a rubber line into the fuel sender, and one into the carb/fuel inlet. The square Facet pumps are a "push" pump, they need to be mounted as close to the fuel tank as practicable, not in the engine bay (where it has to "pull" fuel up).
-
gerg reacted to DannyP in Fuel pump - mechanical vs electric?
That’s what I figured bear351. I think someone has been lazy in the past with just about everything on this car. The Facet pump has been mounted in the engine bay and up high too... go figure.
Ok, looks like I’ll be restoring the mechanical pump (by replacing it with a Goss or Fuelmiser - very available). I’ll pay my local X-series wrecker a visit an see if I can scavenge the relevant hardlines. If they’re difficult to find, rubber hose will do until I manage to get some.
Sent from my iPhone using Tapatalk
-
 gerg got a reaction from Te corty in Crossflow street build
Ok at least the diff centre can be swapped for 28s if need be.
Sent from my CPH2197 using Tapatalk
-
gerg reacted to Te corty in Crossflow street build
hey mate
I was going to use the valves and components from crow cams as what they recommend. Also double row timing chain
yes I was going to get the bottom end balanced.
I was thinking a ATI balancer but not to sure on what’s best.
Also a bigger stall convertor also not sure how big of a stall.
I realise the 25 spline axles won’t last too long. I believe the diff will be the weakest link for me.
it’s a te corty.
So I will be getting the triple webbers and ice ignition set up in the car first.
than slowly put together the engine components.
as they say Rome wasn’t built in a day haha
-
gerg got a reaction from Te corty in Crossflow street build
Gcday mate, that all sounds pretty stout, cam is quite wild at 238/244 (0.050"), 109 lobe but lift is sensible at 0.560/0.570. You will need some serious valvesprings (say 140 on the seat) and retainers to go with that, I would look into what beehive springs you could use (LS type perhaps), single groove valves and collets would be a good idea too. I would get the crank, rods, pistons, balancer and flywheel all balanced as that combo will be a high rpm one that will show up any wonky bits on a long-stroker like that.
Run those cam specs through a dynamic comp calculator and aim to reach low-to-mid 8s, my guess is that you'll likely need to be at around 11:1 static. If/how much you need to shave it will depend on what head you're running and what size chamber. I would expect the HP to be around the mid-200s, which is double what the factory motor had.
One last thing... 25 spline axles aren't very strong. My mild 302/T5 XE wagon has started twisting the axles, and they're 25s. I have a 28 centre and axles ready to go in when time permits.
I remember my TF Corty originally having the tiny Sigma BW type diff (6.5" crown I believe) and while I didn't blow it, it was badly worn and I replaced it with an earlier TE one that had the Falcon 7.8" gears. That would have been a 25 spline but it wasn't a built engine though, fairly mild. I would recommend a 28 centre with cut-down Pintara axles re-drilled for Corty stud pattern. 3.45 gears are easy to find, I even have a spare set myself.
You didn't specify what model your Corty is, but I gave a heads-up anyway.
Sent from my CPH2197 using Tapatalk
-
gerg reacted to Te corty in Crossflow street build
Hey fellas,
im looking at rebuilding my spare crossflow motor for a cortina
Looking at the following
Ice ignition
triple webbers
Crow solid cam 14626
Yella terra roller rockers yt 5011
spool piston and rods
El crank
alloy head has had some porting done.
running a stage 2 C4 gearbox
stock 25 spline diff.
-

 gerg got a reaction from Marks XG in Tips using regular household products
Yet another... Molasses dipping to remove rust. Apparently it's better than blasting or rust converting, but takes weeks to do.
-
gerg reacted to burnnotice1000 in CLEVELAND ENGINE TALK
All done,I had to buy a tool to put the oil screen on,and my stand is leaning over,maybe I should take it off ?
Sent from my SM-A125F using Tapatalk
-
gerg reacted to burnnotice1000 in CLEVELAND ENGINE TALK
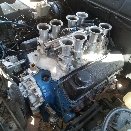
Finally my parts arrived,nice edelbrock covers,water pump and tomorrow put oil pump and sump on,building this 460 from scratch has been a battle.
Sent from my SM-A125F using Tapatalk
-
gerg reacted to burnnotice1000 in CLEVELAND ENGINE TALK
Yeah thanks Jack it's almost done I just put the factory manifold back on it and it fit so good,I tossed the new stamped steel oven tray and put the felpro ones on it with a tad of gasket sealer in the corners and yeah my tiny engine stand is on the limit with this done and it still needs the oil pump and sump on it and its all done I think.
Sent from my SM-A125F using Tapatalk
-
gerg reacted to burnnotice1000 in CLEVELAND ENGINE TALK
Pistons are in ,chain is on,oil slinger and alloy cover also loosely bolted on for a look ,crank sleeve on,also got sent an incorrect oil drive it's about a inch too short, but overall it's going together as planned
Sent from my SM-A125F using Tapatalk
-
gerg reacted to burnnotice1000 in CLEVELAND ENGINE TALK
Got the rear painted and back on the stand and crank in with cam in and 95ft on the mains
Sent from my SM-A125F using Tapatalk
-
gerg reacted to burnnotice1000 in CLEVELAND ENGINE TALK
Update,I got the block back in better than I thought cond,then spent a few hrs giving it its 2nd final clean,wd it,now wait a few days before painting the block,he fitted the pistons as well,also scored a timing pointer this morning.
Sent from my SM-A125F using Tapatalk
-
gerg reacted to burnnotice1000 in CLEVELAND ENGINE TALK
So refreshing to see so much info ,questions I was wondering about and picked up 2 things straight away I needed to know.even has stuff on clevo and 400.
Sent from my SM-A125F using Tapatalk
-
gerg reacted to CHESTNUTXE in CLEVELAND ENGINE TALK
i found a set of caps for the other block ,getting them next month,at least thats something and got them cheap so a line bore is not out of the question anymore,and it will give me another 460 to build or 429 ,im thinking of doing a nice 429 just for something different,rods are the same and pistons are cheap as chips from usa as most go for the 460 build,just some ideas at this stage.
-
 gerg got a reaction from Outback Jack in CLEVELAND ENGINE TALK
Big blocks are cheap horsepower but heavy. Strokers get it done with much less weight but the bits are expensive, only the block basically remains, everything else is turfed for new bits
Sent from my CPH2197 using Tapatalk
-
gerg reacted to CHESTNUTXE in CLEVELAND ENGINE TALK
i took the block down to the machine shop,took the cam bearings and 1 piston to give him something to look at when honing the block,so this time next week we can start to put it together hopefully,i also bought a book on big block building ,should get deliverd soon.