


Jiminy Kriket
-
Content Count
212 -
Joined
-
Last visited
Reputation Activity
-

 Jiminy Kriket reacted to Crazy2287 in BBM on a crossy
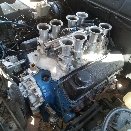
keep the x series injector body as it has the correct angle of installation for the injectors to meet the recess cut into the head intake ports. You also need to space and angle the manifold slightly otherwise it will not clear the distributor and the rocker cover, especially if u have to raise the rocker if you're running big lift.
the intake runners are also 40 mm on the e series manifold so you can use x series injector body to taper from 40 mm to 34 millimetre for the head.
http://www.xfalcon.com/forums/index.php?/topic/34335-e-series-broadband-manifold-onto-efi250-crossy-walk-through/
-
 Jiminy Kriket got a reaction from wagoon in BBM on a crossy
Bolt holes are nowhere near lining up. The crossy stuff is vertical and the bbm has them at about 45 degrees to the port.
As for spacer material, it was going to be aluminium or if the engineering plastic rep comes through work before i get the adaptor made i was going to hassle him for some product recommendations.
I was going to have studs hanging out of the plate to bolt the bbm to and use countersunk bolts to bolt the plate to the head. But as yet, still not gotten that far. Maybe in the next weekend or 2.
-
 Jiminy Kriket got a reaction from Outback Jack in Help needed. BA rough idle issue.
Haven't tried that one yet broken wheel, will tell the old man to give it a go.
Thanks for the advice jack. The scan tool is an odb2 unit, bought it just because the old man got this car.
I'll go have a look at the wreckers and see how much they want for an ecu.
-
 Jiminy Kriket got a reaction from Nath in Crossflow Build Advice
The bell housing you got off me nath will accept the single rail straight onto the back of it. I modified the nose cone of the t5 gearbox to fit the standard single rail bell.
So, if you are planning on going to the drags and have an hour or so spare you could drop the t5 and bolt up a single rail just for the weekend use.
Same drive shaft as well, so no issues there. Just bolt the box up and go playing, then when you need the overdrive to make the work commute easier, bung the t5 back in.
-
Jiminy Kriket got a reaction from Nath in Crossflow Build Advice
Found this site a while back, you could try it to simplify things.
http://www.wallaceracing.com/cr_test2.php
-
Jiminy Kriket got a reaction from Nath in Crossflow Build Advice
The distributor that came with that block is a stock XF TFI distributor. Should work straight up with your MSD unit. Was all in good working order before i stripped the car.
-
 Jiminy Kriket got a reaction from gerg in Tuned extractors
The grade used in most exhaust systems is 410/420 (can't remember which one off the top of my head), and as has been mentioned before it has a slightly lower chrome content so it corrodes on the surface. The flip side of having lower chrome is less stresses from forming, i.e. bending and rolling for the muffler housings, and the corroded layer actually stops any further corrosion from forming. Both 410 and 420 stainless are magnetic as well.
For those who like a bit of light metallurgical reading...
http://www.interlloy.com.au/our-products/stainless-steel/410-martensitic-stainless-steel-bar/
http://www.interlloy.com.au/our-products/stainless-steel/420-martensitic-stainless-steel-bar/
-
Jiminy Kriket got a reaction from gerg in Tuned extractors
The grade used in most exhaust systems is 410/420 (can't remember which one off the top of my head), and as has been mentioned before it has a slightly lower chrome content so it corrodes on the surface. The flip side of having lower chrome is less stresses from forming, i.e. bending and rolling for the muffler housings, and the corroded layer actually stops any further corrosion from forming. Both 410 and 420 stainless are magnetic as well.
For those who like a bit of light metallurgical reading...
http://www.interlloy.com.au/our-products/stainless-steel/410-martensitic-stainless-steel-bar/
http://www.interlloy.com.au/our-products/stainless-steel/420-martensitic-stainless-steel-bar/
-
Jiminy Kriket got a reaction from wagoon in Better Pitman arm brand names
I replaced my pitman arm about a month ago, and can honestly say i saw nothing wrong with the roadsafe pitman arm i put in. Nice and firm, appears to be a really neat forging and the spline in the arm put the steering only a spline out on the steering wheel. So i have no problem with it, took the 1/4" of play out of the arm that was on it.
-
Jiminy Kriket got a reaction from Nath in Crossflow Build Advice
EA box is bog stock, only opened to fix leaks to my knowledge.
-
Jiminy Kriket reacted to Thom in The T5 Conversion Thread
Anything can be fixed/made work miracles just take longer
-
 Jiminy Kriket got a reaction from Thom in The T5 Conversion Thread
Exactly right Gerg. The genuine XF T5 bell housings have the long clutch cable and passenger side throw out lever. And yeah, the outer layer gets glass hard deposits in it from the moulding material normally. On really good sand castings it doesn't happen because they preheat the sand moulds to prevent inclusions. With cast iron, the quicker the cast cools the harder the material gets. That's another reason you can get a hard skin on the cast iron is rapid cooling of the outer layer and slower cooling of the inner.
Well, that explains the 9" mix and matchery i saw in the other thread. Sometimes you need to think outside the box to make things work the way you want.
-
Jiminy Kriket got a reaction from gerg in The T5 Conversion Thread
Yeah, Fitter Machinist by trade Gerg. AS far as the cast iron goes, it has a really hard surface (normal for a sand casting to have some hard areas on the surface) but once you are under it it normally machines really nice. Just gotta make that first cut a nice easy one to get rid of the hard skin.
As far as the closeness of those bolt holes, top passenger side is has about 3.5mm of material between the peaks of the threads and the drives side around 2.5mm. Not a problem so far. The only problem i had was on my first personal bell housing, i didn't have a clue what i was doing and ended up trying to weld a lug straight to the rough cast outer. Lets just say that the cracks appeared while i was fitting. Wasn't happy. thought about it a bit mnor and came up with this process which hasn't failed me yet.
This is the bell housing that Nath-25 will receive, it came out of my dads fairlane.
Thanks for the info Thom. I'll try to keep a look out for them now.
-
 Jiminy Kriket got a reaction from steve mcqueen in The T5 Conversion Thread
Little bit of an idea about how i do these bell housing conversions.
First thing i do is skim the nose cone of the gearbox down to suit the bell housing and while i have it off i change the front bearing and seal.
Second, i reassemble the gearbox and put it onto the bell housing than transfer punch the hole locations. A transfer punch is a bit of high tensile steel that is machine accurate size to the hole with a point machined centrally on the leading end, just like a centre punch.
Third, i take it to the milling machine and using a slot drill, plunge a 25mm hole centrally on the 2 lower positions, leaving a slight shoulder on the bores.
Fourth, I grind a weld prep around the edge of the 25mm holes then i ut some pieces of 25mm diameter bright mild steel and place it into the holes. I leave 1-2mm proud of the surface.
Fifth, I put the bell housing on a 4 ring lpg burner and walk away for about 45 minutes.
Sixth, I use a process called metal spray welding to bone the slugs in place. Metal spray welding uses an oxy acetylene set with a special ($4000 special) gun that has a hopper arrangement on it to feed a nickel based weld powder directly into the oxy flame.
Seventh, Leave the bell housing on the burner for another 45 minutes, but turn the outer ring off. This is what's called a post heat and slowly lets the bell housing cool off.
Eighth, once cooled i take it to the mill and bolt it engine side down onto the bed. I then machine the 2 slugs and any weld protruding above the face down level with the gear box mounting face.
Deburr and bolt together. I've done 8 conversions this way, and am yet to have one fail. Your process is excellent for a home based job Gerg, this is just they way i like to do them. Having access to the expensive gear makes it nice too.
On which bell housing to use, the bell housing i the picture is a 78DA part number. So i am guessing XD-E single rail housing. It needed the 2 extra lugs in the bottom. But i have done a couple at work where the bell housing actually extended far enough below that edge to get the bolts in no worries, just wish i had bothered to note the casting numbers at the time.
Just thought i would throw another option out there for all to see.
-
Jiminy Kriket got a reaction from steve mcqueen in The T5 Conversion Thread
Little bit of an idea about how i do these bell housing conversions.
First thing i do is skim the nose cone of the gearbox down to suit the bell housing and while i have it off i change the front bearing and seal.
Second, i reassemble the gearbox and put it onto the bell housing than transfer punch the hole locations. A transfer punch is a bit of high tensile steel that is machine accurate size to the hole with a point machined centrally on the leading end, just like a centre punch.
Third, i take it to the milling machine and using a slot drill, plunge a 25mm hole centrally on the 2 lower positions, leaving a slight shoulder on the bores.
Fourth, I grind a weld prep around the edge of the 25mm holes then i ut some pieces of 25mm diameter bright mild steel and place it into the holes. I leave 1-2mm proud of the surface.
Fifth, I put the bell housing on a 4 ring lpg burner and walk away for about 45 minutes.
Sixth, I use a process called metal spray welding to bone the slugs in place. Metal spray welding uses an oxy acetylene set with a special ($4000 special) gun that has a hopper arrangement on it to feed a nickel based weld powder directly into the oxy flame.
Seventh, Leave the bell housing on the burner for another 45 minutes, but turn the outer ring off. This is what's called a post heat and slowly lets the bell housing cool off.
Eighth, once cooled i take it to the mill and bolt it engine side down onto the bed. I then machine the 2 slugs and any weld protruding above the face down level with the gear box mounting face.
Deburr and bolt together. I've done 8 conversions this way, and am yet to have one fail. Your process is excellent for a home based job Gerg, this is just they way i like to do them. Having access to the expensive gear makes it nice too.
On which bell housing to use, the bell housing i the picture is a 78DA part number. So i am guessing XD-E single rail housing. It needed the 2 extra lugs in the bottom. But i have done a couple at work where the bell housing actually extended far enough below that edge to get the bolts in no worries, just wish i had bothered to note the casting numbers at the time.
Just thought i would throw another option out there for all to see.
-
 Jiminy Kriket got a reaction from Clevo120Y in ZL - rough idle, pinging, ignition problems
My experience with the EFI 250 is that the slightest little vac leak means the engine won't want to idle properly. My old man's zl needed the vac lines replacing, the rear engine seal, intake gaskets and the rocker cover gasket doing, and it still has a minor fluctuation while in gear. The idle control valve at the back of the rocker cover can sometimes get a build up of crud in it and need cleaning, and while you're in there replace the o ring for some insurance.
On the pinging issue, what year model zl? is it the leaded EFI or unleaded EFI version. The unleaded version has a knock sensor and is a little more tolerant of lower octane fuels. The leaded EFI motor, which my dad has, didn't get the knock sensor. Makes it real touchy to timing and fuel octane rating. He's gotta run 95 minimum just to keep the thing from rattling it's head off.
I think i've covered everything we've done so far. If not, i'm sure someone else will chime in.
-
 Jiminy Kriket got a reaction from bear351c in Furnace brazing... Anyone done it?
The holes are threaded, yes? You could get away with silver soldering threaded rod in there and then redrilling the pattern to suit.
The biggest problem you are going to have soldering or brazing the plug in Gerg is getting the bell housing clean enough down the threads before you
apply the solder or braze. Silver soldering would be preferred because there is a lot less heat involved in melting the solder. Silver solder is also
strong as hell when used this way. Just make sure you get the high silver percentage solder, not the plumbers solder. The higher percentage solder has
a higher bond strength.
The only steel bell housings i have seen are the pressed metal jobbies sold for drag racing applications like a lakewood and the like.
Other than that, you only have cast iron and aluminium as options for stock bell housings.
And on a general note on welding/brazing/soldering cast iron, preheat is your friend. Get it hot enough so it's "smoking" before you try to do any repairs.
At work i use a 4 ring camp burner to preheat larger castings But at home, if it fits and the wife isn't home, into the oven at 150 for about half an hour before
I weld then back into the oven for another 20 minutes after I finish at 150, then leave it in the oven to cool off. This just stops any possible heat spikes that
may harden the cast iron or worst case scenario crack the housing.
-
Jiminy Kriket got a reaction from gerg in The T5 Conversion Thread
The solder appears to have wicked itself all the way around, so the strength should be top notch.
The only thing that may let it down would be the silver solder being only the 15% variety, but if the
wheel studs where staked in like in a wheel hub, the solder is just there as a bit of irish engineering (To be sure to be sure)
Looks the goods. Always good to see how other people get through this sort of mod.
-
Jiminy Kriket reacted to gerg in The T5 Conversion Thread
Wheel studs knocked in and plugs screwed in. Everything fluxed ready to put on the fire: other side:ready to silver braze:cooling down after job:gearbox side:
-
-
Jiminy Kriket reacted to gerg in Furnace brazing... Anyone done it?
Thanks for all your advice fellas I found it very useful. Hope others can too. I'm convinced that silver is the way to go and I'll solder in some studs for the new box while I'm at it. I might start a T5 conversion thread as there seems to be a lot of interest in it.
-
Jiminy Kriket got a reaction from bear351c in Furnace brazing... Anyone done it?
The holes are threaded, yes? You could get away with silver soldering threaded rod in there and then redrilling the pattern to suit.
The biggest problem you are going to have soldering or brazing the plug in Gerg is getting the bell housing clean enough down the threads before you
apply the solder or braze. Silver soldering would be preferred because there is a lot less heat involved in melting the solder. Silver solder is also
strong as hell when used this way. Just make sure you get the high silver percentage solder, not the plumbers solder. The higher percentage solder has
a higher bond strength.
The only steel bell housings i have seen are the pressed metal jobbies sold for drag racing applications like a lakewood and the like.
Other than that, you only have cast iron and aluminium as options for stock bell housings.
And on a general note on welding/brazing/soldering cast iron, preheat is your friend. Get it hot enough so it's "smoking" before you try to do any repairs.
At work i use a 4 ring camp burner to preheat larger castings But at home, if it fits and the wife isn't home, into the oven at 150 for about half an hour before
I weld then back into the oven for another 20 minutes after I finish at 150, then leave it in the oven to cool off. This just stops any possible heat spikes that
may harden the cast iron or worst case scenario crack the housing.
-
Jiminy Kriket got a reaction from bear351c in Furnace brazing... Anyone done it?
The holes are threaded, yes? You could get away with silver soldering threaded rod in there and then redrilling the pattern to suit.
The biggest problem you are going to have soldering or brazing the plug in Gerg is getting the bell housing clean enough down the threads before you
apply the solder or braze. Silver soldering would be preferred because there is a lot less heat involved in melting the solder. Silver solder is also
strong as hell when used this way. Just make sure you get the high silver percentage solder, not the plumbers solder. The higher percentage solder has
a higher bond strength.
The only steel bell housings i have seen are the pressed metal jobbies sold for drag racing applications like a lakewood and the like.
Other than that, you only have cast iron and aluminium as options for stock bell housings.
And on a general note on welding/brazing/soldering cast iron, preheat is your friend. Get it hot enough so it's "smoking" before you try to do any repairs.
At work i use a 4 ring camp burner to preheat larger castings But at home, if it fits and the wife isn't home, into the oven at 150 for about half an hour before
I weld then back into the oven for another 20 minutes after I finish at 150, then leave it in the oven to cool off. This just stops any possible heat spikes that
may harden the cast iron or worst case scenario crack the housing.