

VDO
-
Content Count
164 -
Joined
-
Last visited
Reputation Activity
-

 VDO got a reaction from XTREME KARTS XF in Dodgy fuel gaauge reading
I would say it's probably the gauge.
Are your temp and oil gauges working ok..?
If not then it could be the earth for the cluster.
It's not like an XD sender to cause the reading to jump all over the place.
The most common problem with XD gauges is they tend to read high, due to build up inside the sender and the fuel metering orifices in the sender.
See this:
http://www.ozfalcon.com.au/index.php?/topic/1972-guide-troubleshooting-fuel-level-display-capacitive-probe/?fromsearch=1
But I still think it's the gauge or possibly the wiring.
-
VDO got a reaction from XTREME KARTS XF in Dodgy fuel gaauge reading
I would say it's probably the gauge.
Are your temp and oil gauges working ok..?
If not then it could be the earth for the cluster.
It's not like an XD sender to cause the reading to jump all over the place.
The most common problem with XD gauges is they tend to read high, due to build up inside the sender and the fuel metering orifices in the sender.
See this:
http://www.ozfalcon.com.au/index.php?/topic/1972-guide-troubleshooting-fuel-level-display-capacitive-probe/?fromsearch=1
But I still think it's the gauge or possibly the wiring.
-
 VDO got a reaction from Thom in Speedo clip
Just push down on the white plastic outer clip and then pull.
It should come right out unless the cable into the speedo head is gummed up, which means you'll have to wriggle and pull a bit harder.
-
 VDO got a reaction from JGP in XD removing front guard indicator chrome?
Most of the strip has the plastic clips but there's also retainers with nuts in there, so have a good look inside before prying it off.
If the plastic clips are old and brittle, they're going to break anyway. Just try to save the moulding, the other stuff you can buy.
-
VDO got a reaction from Thom in XC Fuel Sensor R/R
There's no difference except for the fuel pipe out of the sender points a different way to the XA XB types.
You have to drain the tank to below the fuel sender opening, then remove it.
Unless you're going to do an immediate replacement, preferably completely drain the tank so it's not sitting around with a half a tank of fuel exposed to whatever.
Most instrumentation shops can repair your original fuel sender, replacing the resistor pack which is usually worn out and usually costs less than an aftermarket sender.
Would be a better option than some of the dodgy imported senders being sold, then you'll retain an original part with good quality internals.
Install a new "O" ring when refitting and make sure you clean all gunk away from around the sender opening and the clamp, to ensure a good ground connection.
-
 VDO got a reaction from Nath in XD Stock Radio Wires
Hi Nath.
The radio wiring should come from the main loom behind where the radio mounts. I don't know what the one coming from the console is for.
The wires you're looking for are:
Black: Neg/Ground.
Yellow/black; Accessory power 12v +.
Blue/red: Lighting 12v +
You should be able to pick up a 12v + constant for your stereo from the clock wiring just below, I think the wire is light green with yellow trace. You can test it to be sure as long as it supplies power when the ignition is off.
-
VDO got a reaction from Nath in XD Odometer
The little plastic gear that drives the odometer drum crumbles.
Easy enough to replace yourself.
You can get them on ebay, around $15.
Tutorial:
http://www.ozfalcon.com.au/index.php?/topic/287-diy-odometer-gear-replacement-xe-cluster/
-
VDO got a reaction from Nath in XD Odometer
The little plastic gear that drives the odometer drum crumbles.
Easy enough to replace yourself.
You can get them on ebay, around $15.
Tutorial:
http://www.ozfalcon.com.au/index.php?/topic/287-diy-odometer-gear-replacement-xe-cluster/
-
 VDO got a reaction from Mr Polson in Kill Switches!
I found that the easiest method is to cut the trigger feed to the starter motor.
I've used one of the old style floor headlight dip switches under the carpet up highish on the floor left of the pedals.
It means that no one, including a passenger can see you operating the cut out switch.
-
VDO got a reaction from Thom in Installing alarm and remote locking in XF
Hi Panko.
Installing a security system and remote locking in your XF Ghia is not simple, it's a bit of a PITA.
I will help you out with the remote central locking hookup.
The connection will be carried out at the driver's door lock switch area, so remove the door trim and have a look around.
There will be lots of wires going to the power window switch and to the central locking switch and the door lock switch along with a couple to the lock actuator motor and the power window motor.
The system you'll need to adopt for the XF central locking is what's known as the "alternating positive door lock" system.
You'll need 2 x 12 volt relays, each one with all 5 pins, max rating only needs to be around 10 amps. You'll also need some red female spade terminals, preferably unsulated ones.
Locate the main 12 volt feed to the door, which will be the YELLOW wire. You'll need to tap from this to supply the 2 relays.
Locate the 2 wires from the door lock actuator motor that run to the switch, these will be red with yellow trace (lock) and yellow with blue trace (unlock). You'll be cutting these wires near the place where you'll be locating the two relays.
You will be using NEGATIVE trigger from your alarm to each relay for both lock and unlock.
The relays should each be marked with terminal numbers 85, 86, 87, 87a and 30.
One relay will be dedicated for LOCK and the other relay for UNLOCK.
From the YELLOW 12 volt feed wire tap 4 wires from it with spade connectors on the ends and connect these to terminals 87 and 85 on each of the two relays.
Choose one relay to be the LOCK relay. Cut the red/yellow (lock) wire that runs from the actuator to the switch, fit 2 spade terminals and connect the one that goes to the switch to terminal 87a, then connect the one that goes to the actuator to terminal 30. Connect the LOCK negative pulse trigger wire from the alarm to terminal 86.
The same procedure for the UNLOCK relay: Cut the blue/yellow (unlock) wire that runs from the actuator to the switch, fit 2 spade terminals and connect the one that goes to the switch to terminal 87a, then connect the one that goes to the actuator to terminal 30. Connect the UNLOCK negative pulse trigger wire from the alarm to terminal 86.
Secure the relays in a safe area away from moving parts and ensure the terminals aren't touching any metal part of the vehicle.
Tidy the wiring using some zip ties.
Installation complete.
If you get stuck, or have questions, PM me.
-
 VDO got a reaction from Panko in Installing alarm and remote locking in XF
If you need advice along the way, just PM me.
-
 VDO got a reaction from wagoon in Paint code help please
Yes, that's French Blue.
Gilbarco Blue was slightly lighter.
Lasers also came in French Blue.
-
VDO got a reaction from Mr Polson in Kill Switches!
I found that the easiest method is to cut the trigger feed to the starter motor.
I've used one of the old style floor headlight dip switches under the carpet up highish on the floor left of the pedals.
It means that no one, including a passenger can see you operating the cut out switch.
-
VDO got a reaction from Thom in Installing alarm and remote locking in XF
Hi Panko.
Installing a security system and remote locking in your XF Ghia is not simple, it's a bit of a PITA.
I will help you out with the remote central locking hookup.
The connection will be carried out at the driver's door lock switch area, so remove the door trim and have a look around.
There will be lots of wires going to the power window switch and to the central locking switch and the door lock switch along with a couple to the lock actuator motor and the power window motor.
The system you'll need to adopt for the XF central locking is what's known as the "alternating positive door lock" system.
You'll need 2 x 12 volt relays, each one with all 5 pins, max rating only needs to be around 10 amps. You'll also need some red female spade terminals, preferably unsulated ones.
Locate the main 12 volt feed to the door, which will be the YELLOW wire. You'll need to tap from this to supply the 2 relays.
Locate the 2 wires from the door lock actuator motor that run to the switch, these will be red with yellow trace (lock) and yellow with blue trace (unlock). You'll be cutting these wires near the place where you'll be locating the two relays.
You will be using NEGATIVE trigger from your alarm to each relay for both lock and unlock.
The relays should each be marked with terminal numbers 85, 86, 87, 87a and 30.
One relay will be dedicated for LOCK and the other relay for UNLOCK.
From the YELLOW 12 volt feed wire tap 4 wires from it with spade connectors on the ends and connect these to terminals 87 and 85 on each of the two relays.
Choose one relay to be the LOCK relay. Cut the red/yellow (lock) wire that runs from the actuator to the switch, fit 2 spade terminals and connect the one that goes to the switch to terminal 87a, then connect the one that goes to the actuator to terminal 30. Connect the LOCK negative pulse trigger wire from the alarm to terminal 86.
The same procedure for the UNLOCK relay: Cut the blue/yellow (unlock) wire that runs from the actuator to the switch, fit 2 spade terminals and connect the one that goes to the switch to terminal 87a, then connect the one that goes to the actuator to terminal 30. Connect the UNLOCK negative pulse trigger wire from the alarm to terminal 86.
Secure the relays in a safe area away from moving parts and ensure the terminals aren't touching any metal part of the vehicle.
Tidy the wiring using some zip ties.
Installation complete.
If you get stuck, or have questions, PM me.
-
-
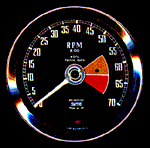
 VDO got a reaction from hendrixhc in Help With Spedo please
Black - Ground
Purple - Positive feed
White - Pulse signal
Connect 12v positive to the purple.
Connect ground to the black.
Now connect a multimeter, red to the purple and the black together with the ground.
Set multimeter to DC Volts.
Very slowly turn the gear and note where you started as you will need to make ONE full rotation and count the pulses as they appear as short pulses of voltage on the multimeter.
Turn the gear VERY SLOWLY or you won't see the pulses. It should pulse 8 times in one rotation.
Any less than 8 pulses or no pulses means the transducer is definitely faulty.
The transducer usually requires around 8 volts but it won't hurt to use 12v just for this test.
If you are getting the correct pulses during test, then your transducer is good and you will need to trace and check the wiring and ensure there's a current supply to the transducer.