


Harrison Kotrolos
-
Content Count
43 -
Joined
-
Last visited
Posts posted by Harrison Kotrolos
-
-
16 minutes ago, SPArKy_Dave said:Need to see pics of the engine/trans installation, to comment properly
This weirdo asking for pics..........
Let me know of any particular angle or view and I shall get them for you (won't be until the weekend though) -
48 minutes ago, deankxf said:the old FAT starter motors did have this issue called "poleing out" (pole) that i never understood what that meant(possibly a short in the armature)
and that makes them weak and often was a result from being cooked by extractors.
the smaller E series/AU etc starter is a direct fit and cheap, but they also die from heat. (heat shield is advised for thrashing regularly etc though ,i built one once)if it cranks slow, i'd say it's either starter or the wire going to it or the earth wire to the block need upgrading.
the grinding noise, definitely teeth on the flywheel related one way or another.
Noice, so if you listen to the video's again you will also see/hear the starter start and then cut out and it all goes quite, no spinning or grinding. While I have an ECU all the original wiring is cranking the car and the ECU has no control on the starter or distributing power. Any thoughts on that one? Back connection in steering column? Dying inhibitor switch?
My plan for this weekend I think is follows- Pull starter and take off transmission cover plate and inspect flexplate for play.
- Run clean new wiring with an external switch and relay and test starter on a separate circut.
- Test inhibitor switch.
-
15 hours ago, deankxf said:next time the starter motor is out (5minute job really)
see if its' loose. i have heard of flex plate bolts coming loose from the crank, and i also have had one instance where the rivets holding the ring gear on were loose. (most are welded but some were riveted as below)also My Dad's leyland V8 had cracked a flexplate once which may put it out of alignment.
it's hard to say really.
i downloaded your video, sounds terrible for sure
Will pull the starter out on the weekend and check for play, yeah it sounds even worse in person. I've been dealing with it, but now it's just embarrsing when people are watching your car and your taking 10 minutes to start :)
22 minutes ago, bear351c said:Had the bolts come loose on my old ZL land yacht. Sound was generally worse at idle, like a lifter/rocker rattle. Most engines will always stop at the same 1 or 2 places on the flywheel/flexplate, so if the teeth are munted they will usually be in the same spot next time you try an start it. It is a common issue on inline sixes. If it struggles to crank when hot, thats a slightly different issue. Maybe timing, fuel evap related. Check timing is around 8 degrees, try 10, if the balancer has slipped, and try to move the fuel line away from any heat.
Let us know how ya get on.
Yep, I think I got two spots where they are munted and when the mechanic had a looked he said overall the teeth had all been worn bad. So will check for play to start but will probably pull the engine out to replace flexplate, I have to change the rear main seal also :(
I have 12 degrees I think set on timing. Balancer is brand new, as the old one tore the outer ring from the inner hub on the dyno (Great fun)
Will need to make another post to show how it was done, but I'm one of those idiots who would die for the crossy and spent a bunch of money converting it to EFI and running a Haltech ECU with all the bells and whistles so I've been testing this with injectors off and on and problem is the same.
I have thought maybe the starter is damaged and then getting heat soaked sitting there and making the problem worse.
bear351c and deankxf reacted to this -
39 minutes ago, deankxf said:your video isn't public,
You need access
Request access, or switch to an account with access.
sounds to me by description that the ring gear is fubar though, and changing flexplate would fix it.
starters are same for BW and C4 as far as i am concerned, i've swapped a few in the past.
tooth count i doubt would be different but it's likely not going to be the same flexplate for both seeing the bw 35 holds on to torque converter with 3 bolts from memory rather than 4 nuts
The link should be fixed now, my good man.
Yeah understood. My flexplate holds on with four bolts onto the torque converter.
I also thought it was flexplate, which in some instances it does sound like it.
But it grinds in any position or cuts out and dies but hopefully, the videos show that it's not just jumping, it's just going nuts. -
Apologies forgot to add.
Even if it does start to crank properly, it's so damn loud and sounds like it's grinding itself to death.
I've also changed the starter relay, new 30 AMP wiring for earth and power to switch connector on starter, new battery and battery is at 13.4V
Google drive to videos below (because they are massive for some reason) First video is in PARK second is in NEUTRAL
https://drive.google.com/drive/folders/1KICR7HD7o51hgR22cT9haI4Ro9dvL-TT?usp=drive_link
-
Hi All,
I'm chasing my tail on this one.
I'm on my THIRD starter motor because I love killing them.
I will preface this with I know I've sheared a couple of teeth on the flexplate, but it doesn't explain my issues.
My car just hate's starting, I've tried adjusting the shifter linkage because I thought maybe the inhibitator switch isn't lining up, I've tried Bosch Starters, Chinese Starters and all.
In no apparent pattern or order I have the following issues, the issues do seem to get worse the hotter the car is:
- Starter grinds against flexplate
- Starter starts turning the engine then stops and cuts all power to car
- Starter starts turning engine and then just starts spinning
This happens whether I'm in Park or Neutral. I've taken it to my mechanic who actually backed the starter out and rotated it a little which improved it slightly.
I've got a BW35, behind a Crossy 4.1.
I'm planning on ordering the following to get a fresh FlexPlate with all the teeth on it https://automatictransmission.com.au/shop/ford-xy-xa-xb-xc-xd-xe-xf-6cyl-borg-warner-35-and-40-flexplate/?srsltid=AfmBOoqFVDdLaWauWTbQEhwmvDvaiDNEZ6lWfIhV1IYaU88SxR78ykF0#
Will upload a video shortly.
A couple of questions to fire:
- Would there be different starters for C4 or BW crossflows?
- Would there be different flexplate teeth count that I should watch out for?
Any other help or guidance would be awesome.
Thanks,
Harry
-
Or anyone else.
C2 Alloy head, what spark plugs should I be using? I'm currently running NBK BP5ES, but you can also get NGK BRE527Y-11 for XF Alloy Head.
The BRE527Y-11 has a longer electrode and sticks into the chamber more.
-
7 hours ago, deankxf said:
I can't advise any oil pressure numbers, it's likely listed in the gregorys etc though,feel free to start a project thread to document anything you do in the build.
i could retitle this thread as your own even if it's mostly crossflow related
@SPArKy_Dave may have more info, as he does checks like this due to being more meticulous. (I've either got someone to reco a full engine or chucked in a second hand one, and that's usually not oil pressure related, just extreme wear overall)
Would be great if you can re-title the thread, will be all Crossflow related, think some people might be really interested in what I'm doing
")
Title - Crossflow Engine Rebuild - Threat and Help?3 hours ago, SPArKy_Dave said:I'm probably not one to advise either, tbh...
I used to run my XF wagon, with the oil light flashing at idle on hot days.
I just thought it must be on the worn side, till I had the bright idea to fit a new oil switch one day.
Problem solved...
At the same time, I tested the pressure with a manual gauge.
25psi at idle from memory.
40-50psi whilst holding revs around 3k-ish rpm.
Okay, so sounds like I'm on the money, I need to fix up my shroud for my oil cooler to be more efficient, as when it get's up to 50 - 60 degrees, my oil pressure will drop down to 380-390 KPA (~55 PSI)
6 hours ago, Thom said:General rule of thumb for oil pressure is 10 psi per 1000 rpm is adequate, so in that case you have plenty, you can shim the pressure relief for a little more but unless you are planning to spin it over 6k rpm there's no need, as all you are doing with higher than necessary oil pressure is putting extra load on the oil pump drive, which other than breaking the oil pump drive can cause issues like spark scatter, excessive wear on the distributor drive gear and the distributor housing, in saying all that you do want to make sure you oil pressure relief isn't stuck open and moves freely as while you do have enough oil pressure to not have any problems I've routinely seen stock oil pumps provide 80psi when cold above idle and 65-70psi warm at 4-6000rpm on a freshly rebuilt engine, but that also depends on your bearing tolerances, reading your original post if the pressure relief valve isn't stuck i wouldn't change anything
Thanks Thom, will update the thread as I pull it down and re-measure everything. Bearings are already 0.030 bigger, and to get tighter clearances would require a re-grind and jumping up to 0.04.
I'm pretty happy with the oil pressure, probably could do with a better sump though.deankxf reacted to this -
Hi All,
I got a worked 250 Crossflow that I must pull out and tear down.
I've had to replace the flywheel and harmonic balancer, and it's starting to build some harmonics above 4000rpm.
Everything else seems healthy, but I thought I checked with the experts.
It's got a new STD Mellings Oil Pump (only about 9 months old), and running 20W-50, my oil pressure will range from 320 kpa (46 PSI) to 410 kpa (59 PSI).
Breakdown of oil pressure:
- Cold Idle: 380 KPA/55PSI
- Hot Idle (900RPM): 315 KPA/45 PSI
- Hot RPM (5000RPM): 410KPA/59PSI
How do those numbers stack up? I'll be upping compression for this next rebuild, and the car is used for weekends and tracking.
Should I try and raise the bypass on the oil pump a little? Get the RPM pressure up some more?
Any advice is welcome.
Also, where should I make a thread to track the engine rebuild and ask any questions I might have?
Thanks,
Harry
deankxf reacted to this -
Some photos of the data logged from today


-
3 hours ago, Slow250XC said:Still alive crunk.
Your link won't work for me, probably operator error at this end.
I would fit a manual gauge and check the pressure with that first and foremost.
Eliminates the chance of a dodgy sender unit.
Triple check all connections in the oil pressure sensor circuit from the sender to the ecu.
Once you have verified there actually is an issue, then can proceed to next step.Bloody awesome, place is a gold mine of knowledge, don't want it leaving me
Let me know if the owner is around, I work in IT and can get the cert renewed.
Have done. When running both the ECU gauge and original cluster gauge, they operated identically and showed similar results.
Also then double checked all wiring, moved the ECU gauge directly onto the block (where the factory mounts), and changed to a new sensor as well.
All the exact same results.
Can also verify it's happening, you can feel slight metal on metal, and I think the long drive from Sydney back to Orange did more damage than I want to know, as a small bump noise is occurring when the pressure drops.
I've already flushed the system twice and tried various oils, all with similar results.
Uploading today's drive now, when the oil is cold on the first start and for the following 5 - 10 minutes, I get consistent pressure, both driving and holding RPM.
But once it's warmed up the erratic behaviour starts. Even with 20W-60, I guess going a heavier oil might help, but I would have thought by that point I would hear some serious knocking or noises at any RPM?
What would be your recommended next step?
-
Hi all,
Not sure if this forum is still alive, given the expired certificate an all.
But I've got a terrible oil pressure problem, full story is on this forum - https://www.fordforums.com.au/showthread.php?p=6744749#post6744749
Quick run down on the engine
- Was re-built by Duncan Foster in Sydney around 8-9 years ago
- Balanced and blueprinted
- Is now running a C2 alloy head, rollers, XF EFI and Haltech.
- Otherwise all stock internally
My latest update from today
So removed all the oil cooling and ran the engine stock.
New Z9 filter, HPR10 Racing oil, 20W-50.
Initially started okay, around 350KPA, and that was the end.
Engine did run hotter without the cooler, and when I stopped the car it sounded like a waterfall, at least 2-3 litres of oil dropped to the sump.
Is it normal for so much oil to be running to the bottom? I checked the oil while the car was running, nothing showed up on the dipstick....is that normal?
But otherwise, occasional 350kpa of oil pressure, otherwise oil pressure below 100kpa. It was just pain watching it, car wasn't making any terrible sounds, actually sounded fine.
Expect for the flat spot where it was at 5, I was just parked seeing what would happen, it just sat at 5kpa, never came up or anything.
Here is a photo of the data logged, showing pressure, RPM, throttle and coolant
Thoughts from anyone would be great, I'm hoping its a bad oil pump problem, but I think some bearings are just done in the car.
I've never hard metal chunks or bits come out of the oil, and it's hard to tell if the engine is actually dying, it was balanced perfectly so it runs smooth, even up to that 5000rpm on the photo, it was silk.
But the low oil pressure is definitely taking a tole, I can slowly hear it. Especially when at red lights.
I'm obviously just lost and a little defeated, the engine has always run very nice over it's life. It's just gotten back on the road this year after being off for 2 years.
-
Hi All,
I'm doing a Carb to EFI conversion on my Falcon XC.
Almost done, and might put the progress and everything on here for others to also dread in the horrors of EFI wiring.
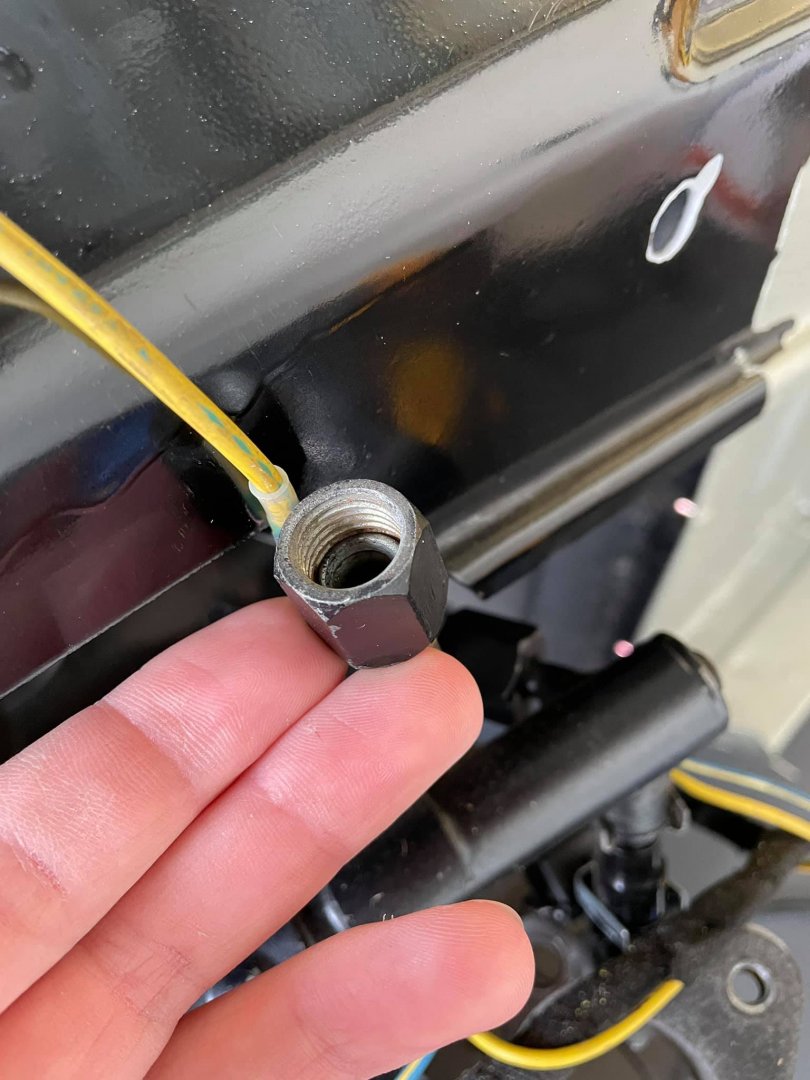
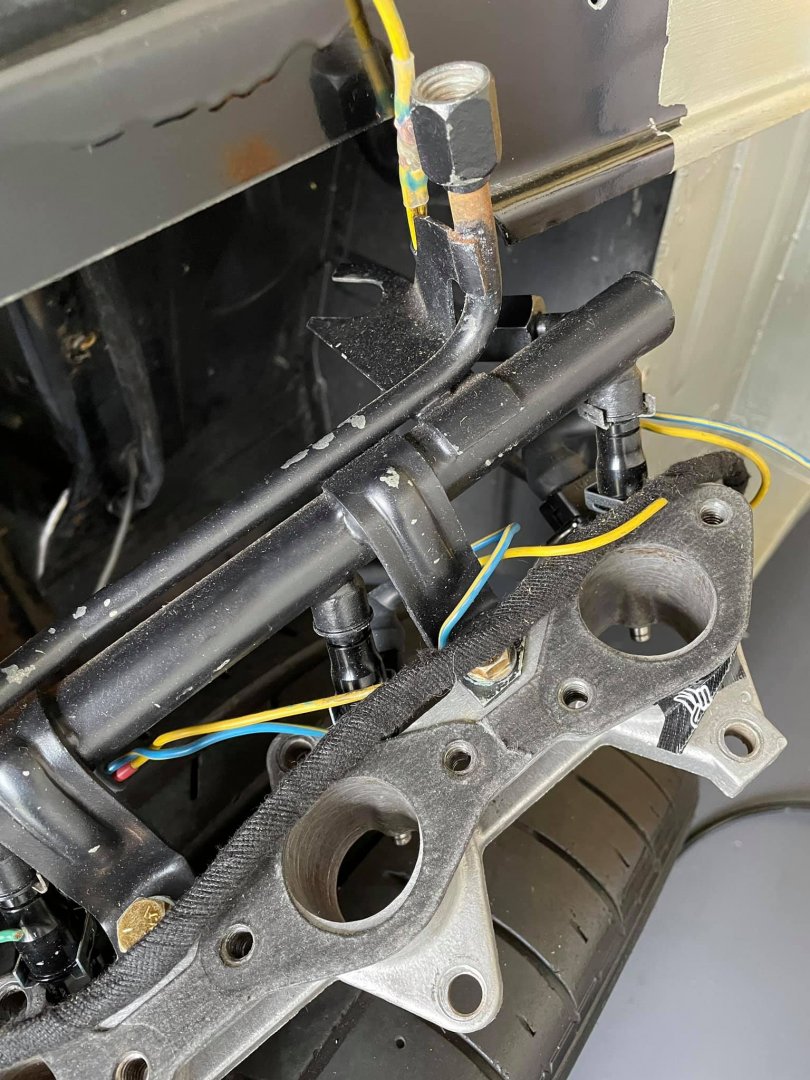
But for now, I'm trying to finish my fuel lines and I have an original XF EFI fuel rail, would anyone know what fitting type would be used for these?
Measuring the threads gave me a metric 1.5mm but I could be wrong.
Any help would be greatly appreciated.
Thanks,
HK
-
Hey allll,
Sorry for the lack of updates or responses, had business work, uni exams and went to Japan for a couple of weeks.
ANYWAYYY, so much has happened I will for sure update you all on everything that happened and is happening. But be assured the car is safe and better than ever.
I will upload pics and update you all in the coming days.
To get a true compression ratio, is quite involved. You need a lot of information, such as the swept volume of the cylinder, bore width, the cc of the combustion chamber in the head, thickness of head gasket....etc, etc. Do a bit of surfing on YooToob, it's can be done at home.
Hey bear351c,
Really sorry for such poor response, I appreciate the help and advice and took it on, found out the compression is around low 10's high 9's, so not too bad, nothing crazy, just a street and occasional track motor.
But like I said, thankyou for the advice, helped a lot, and couple of youtube videos and online calculators later I got some results.
I use an online calculator. Google compression ratio calculator and heaps come up. I use the RSR one. But there are plenty to choose from. You will need to know several figures and if you use the RSR calculator it actually has tech tips that explain how to get the info required for that box. Very handy for those just starting out.
You will need to measure the cc of your combustion chamber as well as piston top cc's. A normal old syringe is handy for this or if you are close to a Bunnings, go the the mower section where they have fuel cans and the like and you will find a big syringe used for 2 stroke oil mixing etc. they are a good size, especially for the head chambers which are rather large. From 40-59odd cc, depending on head and how much is shaved off.
A set of vernier calipers is helpful to work out deck height but it can also be done with a set of feeler gauges with some accuracy. I'm pretty sure I did a spell on it in the Mad Scientist Crossflow thread.
Oh and that 15 gain was HP. I don't work in the new fanged kills wasps thing.Hey there ando76,
Same goes to you, really sorry about poor response, but I did take your advice as well, found a couple of online calculators, hardest part was trying to figure out gasket size and all those little annoying measurements.
I understand what you mean about that gain with the MSD Programmable box and TFI dizzy ignition, once you put some advance and get a graph, does a world of good to the car.
Was running stock motor, with few bolt on upgrades and a balance, and even with advance and a proper ignition and big spark, I was closely keeping up with your everyday p-platers and family cars.
But now that the engine has all changed I need to start from the beginning.
I have a few questions. And anyone is more then welcome to respond.
What would your cranking timing be??? I want to get her to a number where she will fire straight away with a single pump, and fire really well now in winter when its cold. Would I want more advance in the cold or less???
Second questions. What would your recommended idle and initil timing be??? Do I start her low like between 10-15 degrees, and build the timing up quickly, or do I start her high, around 15-20degrees and graduate the timing with rpm.
The specs of the motor are:
- 350 Holley
- Extractors 2 1/4 inch exhaust/ straight pipe
- Balanced motor internal and external
- Ported head
- Crow 14776 204INT 214EXT
- Electric Fuel Pump
- Electric Fan
- Auto
- 3.45 diff gears
Because she is balanced, she really likes to revv, once she gets going, you are already going to change to next gear.
Final question, what would your total timing be??? 32 degrees??? and when should I hit total timing, if crows spec sheet says the cams range is 1500-4500rpm
All the info will be much help
I must say ive never kept a valve train in order just blow it apart with a rattle gun put it all in a box
are you staying cast head? you want one? I have one out the back new guides fitted seats cut for 1.9s and 1.6 valves and its machined for screw in studs I robbed the valve train out of it as it has single piece single groove valves I just chucked it in the back of a wreck you can have it if you want itHey there PRO250,
Last person, I'm sorry for not responding, especially with that generous offer, unfortunately I won't be needing the head. BUTTTT, fortunately, I found out my head already has larger valves, so fantastic new there, I didn't do them, so they must of been done in the past, which is just an awesome surprise to find.
I got some port work done and what not, but I will eventually change to alloy, its lighter, got a better design, and alround nicer. Not that I have a problem with the IRON, if you get work done they are a really good head, but no harm in losing a couple kgs, the iron weighs a TONEEEE.
-
Hey everyone,
So I've been gone for a while, and got back into Sydney after that huge storm hit. And well my worse nightmares, the rear footwells of my Falcon XC Sedan were a pool, I honestly have no idea where it came from.
So Going to start with the rubbers, maybe they aren't on right, and then get the doors aligned again, because they aren't aligned properly yet.
It seems to be coming from the front doors but at the rear, because its wet under the front seats as well.
Anyway, Could you lovely people please EMAIL, or POST, or MESSAGE, some photos of your cars, and your rubbers you got installed.
Need detailed photos, from the door belt of the door, to the pinch weld and door frame rubbers, Need front and back doors and photos.
It will be greatly apprectiated.
Cheers, Harry
-
The worst I have seen one make over locked timing is 15@ the tyres. Funnily enough I took that same car/engine and made another 15 with more time and care on the graph and the tune. It's about getting the right timing and fuel at each chosen rpm point. The more time you have on the dyno, the crisper you make it.
When you look at what they can do, especially with a map sensor input, it's not too far removed from what a decent ecu can achieve. Just not as refined and with the self tuning most ecu's have. But with time and patience you can map/Throttle tune a carb car, just like you might with an ecu. Yes you will have to do jet, air bleed and power valve changes instead of just inputting data into a table but you can get similar tune quality. Problem is it just won't have the consistency of an efi system as things change. But still it's not bad and a definite improvement on recurving a distributor.
Wow really??? That's crazy, 15hp or kws??? Yeah I did a nice basic graph, I didn't have a dyno and only had my bum, so I basically tuned it to pull and rev perfectly at each rev range under different loads, it actually ended up with a pretty aggressive graph due to the small cam, I needed to burn the huge amount of fuel being pushed in with the lack of air.
Okay so MAP sensor is a must I have been told, will ad one tot he system, with the manifold you have the little tree on it that creates vacuum for the brake booster, do you think I could use on of those ports?? Or should I drill holes and tap a sensor pung closer to the entrance tot he carby????
And yeah way better then points, and better then recurving, especially since recurving its still pretty locked, where as with this graph, you can create a graph that is really customized at each point, and then you can create a "hot day" graph and a "cold day" graph, and load one graph to the turbo or retard setup, and when you flick a switch it will load that graph
Okay so I have finally started taking apart the engine ready for cam swap and train swap. For now I have simply taken the head off.
I started by taking the battery out, and disconnecting all the hoses and what not, after removing the carby I came to a sad and unfortunate resolution that I had blown part of the gasket on the carby to the manifold, which really sucked. Probably my fault for not checking the torque on the bolts after breaking the motor in.
I then removed the manifold and then started with the main engine parts. Unfortunately, I had issues removing some bolts that hole the extractors, and in want of no stripping or breaking them, I decided to leave it bolted in. It also turned out it makes a great handle with lifting the head off.
Okay, so taking off the rocker cover, we can see the stock valve train, pretty basic, nothing fancy, there are some progress shots showing the progress, nothing really special to report at the moment.


There is a method to removing the head. First you got to take the rocker arms off, and to do this, you need to get the first piston to TDC on the compression stroke, and then take off INT1 EXT1, EXT2 and so on, cannot really remember the whole list, basically you are taking all the rockers that have no compression on the springs
You then spin the engine to TDC 6 piston for compression stroke, and take of the remaining rocker arms.
MAKE SURE YOU MARK EACH ROCKER ARM WHERE IT WENT IF YOU ARE KEEPING THEM
Engines are very temperamental machines, you are basically controlling mini explosions in a chamber, so the parts of the motor kinda wear in a different way to there opposing or similar parts, so the engine may not like swapping of rocker arms, so make sure they go back where they came from, you'll save yourself hassles and a problems.
Next point, pull out the pushrods, and TECH TIP, get a piece of cardboard and poke 12 holes in it and mark them 1-12, and put each pushrod in the corresponding hole. Again this relates to the idea of each engine part wearing in similar to the last.
Next you need to crack all the bolts holding the block down, there is a pattern to this, and it starts from the outside in, because you torque the head down from the inside out. Once you crack them all, then take them off and well crack the gasket and you are there, the head can come off.
Okay, so these next photos show the rocker arms, as I took a closer look, I realised these arms all have different stampings on them. Can someone please explain to me the stamping on these arms, and why there are different?? Are they even stock???


Finally, here are the shots of the head off and pistons spinning and images of the pistons, that liquid was oil I squirted into the chamber when doing a compression test, its good to know the piston seals survived the break in, and seal the pistons really well and that the oil is still there in the chambers and hasn't leaked down.


Looking from the pistons, anyone want to give input to the condition of the motor, and information on the pistons in there??? And way I can work out the compression now that the engine is open???
Thanks everyone for there input, look forward to hearing your photos on the breaking down the motor, and anything you spot.
Will keep you updated with progress
-
Yep MSD 6al2 programmable is a good piece of kit. Been saying it for years.
My advice. Ditch the iron head and go alloy. Lighter better. But I understand you have the manifold to suit so this will add more dollars.
You mention the seats are hardened but not what the seat cut is. You want advice on porting but I can tell you that the greatest air speed gains are made at the seat. Get a proper multi angle seat cut and valves back cut and face cut to suit and you will make more gains than any well intentioned amateur porter can achieve.
Proper porting takes time, patience, a steady had and most of all experience. Get it wrong and you will stuff things. Every runner, throat, cross sectional area needs to be the same or you will have just wasted all that money on a balanced engine cause your intakes won't be balanced.
Get a head and start practicing if your are truly interested in porting. Get some good measuring tools to ensure that you are taking the same amount of meat out of each throat, runner etc. Many will tell you that porting is easy, but that's not true. Picking up a die grinder and having a go is easy. Getting it 100% right is not and takes time. You will get there but practice, practice practice.
Amen to that, the MSD is an amazing piece of kit and just rocks the world with the crossflows. The ability to tune the graph to any modifications you do to the motor, or even different driving conditions is just fantastic.
Any idea the power gains of installing the system, it has to be an easy 10kw????
Here is the link to my forum on the system
http://www.ozfalcon.com.au/index.php?/topic/5876-falcon-xc-msd-ignition-help/page-2
Below are some photos of how I've installed and set it up:
(At the current moment I'm having issues with photobucket, so will upload when its working)
Yeah I have been told that a lot, trust me I'm considering it for future upgrades to this motor, especially with certain plans I have for it, but the current moment, I just kinda wanna use the equipment I have and the money spent on it. So going to stick with the iron head for now.
Thankyou for the pointer about the valve seats, to be honest don't have any documentation in regards to the seat cut, any particular way of telling?? Could I take a photo and let you look at it???
I understand what you mean in regard to having it even and flowing right, and makes perfect sense, guess I will just kinda clean up the burred edges and the shitty casting, because there is a fair amount of it in the head and the Redline intake, and I will just be careful not to take too much meat out of the metal in order to not change the shape of the runners and what not.
I will eventually be practicing, I'm guessing there has to be a tool or device in order to test flowing and what not???
This gives me hope!! Haha.
Ive just finished a similar build.
Motor is all rebuilt. Fully balanced bottom end like yours.
Im alloy head, ported with bigger in n ex valves. Running the crow cam 214 214 cam with valve train kit. Electronic dizzy graphed for the cam, comp (9.8:1) and 98 fuel.
BUT, im still running single barrel and standard inlet n exhaust manifolds. Someone has put a 2 inch exhaust on before me and got rid of the front muffler.
Pulls hard from 2-3500, but just makes noise afterwards.
I know i know, im choking it. Sucking n blowing through straws.
Im changing to 350 holley, redline torker manifold soon.
Also have 6-3-1 extractors and will put 2.5" mandrel bent exhaust with one muffler.
I will dyno the car before n after for the laughs.
youve done well!
Sent from my SM-G900I using Tapatalk
Haha Glad I could give you hope, as I was building this car, a lot of people shot down any of my questions about the crossflow, saying if I wanted a fast car I should be smart and just put a V8 in it. But each to there own, I love the crossie, its just awesome and different, anyone can buy a built V8 600+hp package and put it in, but not many people can get an awesome crossie that's reliable going.
Loving the package, you should get really nice numbers with that setup, especially with the alloy head, will run cooler and nicer, especially with bigger valves.
How does the cam feel?? Does the car feel peppy?? I'm about to install mine in about 3-4 weeks time, and I cannot wait just to feel it, like ARGHHH hahahahha
And YEAHHH, don't worry, I was choking my holley and exhaust with such a small cam on my car, you got to kinda slowly put stuff together, bit by bit. The key is to match it all up, if all your pieces don't sink up, then it just won't feel right.
You will enjoy the 350, its a nice carby, will suit the cam perfectly, and you will notice a HUGE difference, I'm running mine currently a little rich, and when you down shift to slow down, the thing just Burbles, Crackles and Pops, ITS AMAZING hahaha
With the 350 though, because its not a progressive carby, it love WOT, so to kinda make it friendly to part throttle and cuirsing, you got to get the timing right. I strongly recommend the MSD setup, especially programmable, it is deer, but its great system.
With the exhaust, I would probably recommend a 3" system minimum, I had a 2 1/4, it made lots of low down torque, as you can see in the dyno graph, because there was massive back pressure, but with a cam that has 214 EXT, you want the 3" nice and flowing, and with a nice muffler in the standard spot.
Yeah dyno and having figures is always fun, good to know what works and what doesn't. I would really love to dyno the car now, with the electronic ignition, just to know how much more power I gained from ditching the points ignition. Because before it didn't even make it to 15 degrees advance, now its running max 36 degrees, and with a spark the looks like a welding arch.
Take a look at my forum about the system, and the helpful tips as well:
http://www.ozfalcon.com.au/index.php?/topic/5876-falcon-xc-msd-ignition-help/page-1
-
Okayyyy,
hey everyone,
So this is the go. As you can see below, there is my dyno sheet from like a year ago, this is after the motor was run in, and done an oil change and spark change. After fixing the issue of not having WOT, we started tuning the car, turns out it was super rich, and we had to go down 10 jets, as well as change power valve twice. As you can see in the photo, it made a solid 102RWKW, with 325NM of torque, now it may not seem impressive, but I will soon tell you why that is freaking amazing.

So factory these motors made like 82KW at the flywheel, so already we are seeing a gain in like 30KW, and whats more impressive, this is all on a stock cam. I KNOW, i'm crazy, why would I make a nice tasting soup, with shitty ingredients, well the reason being is I rebuilt the motor and it sat there for 2-3 years in damp and dusty and shitty conditions. Soooo, i built the motor to specs, and got it running, once I broke it in, and got all the gremlines out, I decided then that it was good to start upgrading on it, I just needed to confirm it had a good base to work on.
So these are the specs at the time of the dyno sheet that made 102RWKW:
Stock CAM, 190 INT at .050 and 190EXT at .050
2BBL Redline Manifold
350 Holley
PaceMaker Extractors
2 1/4 Inch Exhuast
Mechanical Fuel Pump
High 9's compression
98 Octane
Balnced motor internally and externally
Thermo Fans
Original Un-Graphed Points Ignition
2.92 Gearing
So as you can see, probably the worse setup of all time, not only did I have points igntion, but it wasn't even graphed for this carby or setup, it was graphed from whatever they had from factory for the downdraught carby hahahahhaha
So as you could imagine the car ran like a dog, even when tuned, it still bogged and just didn't feel together, I felt like a liability on the road.
So now I am going to tell you about my next step in the process, I want you guys to throw my input, pointers, tips and discussion, let me make clear, I know its not cheap, its a crossflow, and to make reliable HP you can't use the word cheap, you got to spend time and money to make it, and I understand that, so fire ideas at me, I am hung on the idea of making a pissed off crossflow, and I have read forums of you guys doing it, so teach me your ways hahahahah
So I am aiming for 150RWKW, as a minimum, like if I get more, thats aweosme, but I am being realistic, with the parts I have bought. Lets start of, witht he old setup that is on the dyno sheet, without the air filter I made 110-112RWKW, so straight up we already know the first modification, change the air filter.
Next up, if you guys have been following me other forums, you will know that I have ditched the old shitty points, and gone full electric and programmable.
CANNOT STRESS THIS, ANYONE DOING A CROSSFLOW, this should be like your first upgrade, like the car starts straight away, warms up quickly, its responsive like crazy, pulls so fucking hard, and most of all is reliable and fuel efficient.
Like this is an amazing setup, it gives you massive headroom for future upgrades, makes the car drive and feel like a brand new car but with a carby, and most of all, you save money on not having to re-graph your dizzy all the time, because the system is so adaptable.
So i will tell you what it is, and you can check out my forum on the great tips from fellow falcon lovers and how I did it, and results.
I bought a MSD 6AL-2 programmable box, this is an amazing kit, you basically advance your timing as far as you want, lock it down, and retard it all the way and make your own graph, I KNOW MAKE YOUR OWN GRAPH, how amazing is that.
Next I coupled that with an SS Blaster Coil, and 8.5MM Super COnductor Leads, I went with these leads, because I had upgrade the voltage output and spark, plus they come in a universal kit, and you can cut and make them to suit your engine and setup, plusss the kit is for V8's so you get two spare leads hahahahah
Finally, what runs this setup is a EFI TFI dizzy from what I believe is a XF falcon.
Okay so whats next, well CAM upgrade. Now I went with Crow Cams, because I have used them a lot with previous engine builds and racing, so I have had good history with them. Of course there are many other cam providers out there, so it is up to personal preference. The cam I went with, is a huge step up from stock, but is not the maximum cam I could of gone with.
Now stock this motors cam is 190, and 190, now that's pathetic, with the cam I got, its 204 and 214, which is a huge upgrade, and will make a world of difference. Now I could of gone with 214 and 214 or a 214 and 224, which would of been great with the 350 holley, and made even more power, but I wasn't really wanting to install roller rockers, because of the surpassing of .500 lift, and the need for rollers, to make it reliable. This is because I have future plans for this motor, to make it a machine, so for now, it was more of a cam upgrade as to not waste the potential of the holley and other pieces, as well as making more power and fun.
Okay, so you know the cam specs, which are 204 INT and 214 EXH, I have Double Valve Springs, Retainers, Rods, and Lifters to suit the package, so the whole package will be reliable and work great, especially since I used the original rods, hahahaha
Okayyyy, so lets see what we got. I have a perfectly balanced bottom end, internally and externally, like from pistons, to rods, to gudgeon pins, crank, flywheel, balancer, etc hahahahha So I put some money into the bottom end hahahaha
Lets pair that with, new top end gear, and double springs to increase the spring compression capabilities, so at the current moment the car revs to 5500rpm, with a stock cam and springs, pretty happily, I am reckoning with the new setup, easy 6500rpm, which lets be honest, is awesome, but it will probs make power to about 5500rpm, then drop. As you can see in the old dyno, it drops off after 4250rpm, but massive torque early on, which is what these motors are good for
So far looking at a revvy motor, which is good, because that means I'll have a very open motor, that will be free and happy to spin around constantly hahahah on top of that, loads of torque, hoping for power to come on about 2000rpm, till 5000rpm, nice rev range, good for passing and the occasional burnout hahahahha
Okay whats next, of course I want to do some head work, I'm pulling the head off, it has harden valves, with harden seats for unleaded 98 octane, so I want to port it out a bit, because well I have better flowing cam, the 350 holley, and nice flowing extractors and exhaust. So I want your guys help and tips, simply put, I cannot afford a professional job at the moment, so I just want to do a little myself at home, I'm not wanting a massive job and gains, just a little, cleaning up the cast and the chambers, but mainly the actual runners. So if you guys can give me some pointers, its an early Iron head for XC falcon, any particular parts to pay attention to??? Some pointers???
I will also upload pics of the head bare, and you guys can like download them, and draw circles on places I should grind down and flow a bit better
Like I said, cannot afford massive professional job, so just simple, at home, cleaning up and some grinding, I know it can be done, seen forums on here, so fire away some pointers
Okay, so this is what we got, perfect ignition, advance to 38, and a curve that will be readjusted when the new cam is in.
I will be getting a new open element air filter, to gain those lost KW's back
I then have new cam and suited gear
As well as balanced engine
Now, I am making a new custom fuel lines, from the tank, with a electric fuel pump, and completely removing the mechanical fuel pump and blocking it off.
I have thermos fans installed, as well as an external oil cooler, so cooling is all good.
The holley will be retuned, and I have also put on a carby space, just to move the curve up a little, and its also a heat soaker, because the engine runs pretty warm
Finally, is the exhaust, at the moment I have a 2 1/4 inch exhaust, straight through, with straight through muffler. This is pretty good with the current setup, but as you can see, the new cam addssss wayyyyy more exhaust duration, meaning increase in exhaust gasses which are exiting, of course the 2 1/4 inch exhaust is just going to rob power, so I am thinking 2 1/2 inch, or possible 3 inch, with a resonator just after extractors, and a flowmaster super 40 muffler.
Let me know what size exhaust think I will benefit max horsepower, trying to squeeze every pony, and I am going to get custom tubes and weld it up at home as much as possible
So I think that is everything, I'll keep you guys updated, and I cannot wait for your input on this journey especially with port flowing and exhaust.
Thankyou All
Mixalis reacted to this -
Shit it's finished............!!!! I thought you just started building this. Very, not bad.

Wooooops, shouldn't have uploaded the photo, gave away the big surprise hahahaha
No no, I have finished the car, I started this build 5 years ago, and basically starting from the beginning and creating a written account of my journey to share with everyone.
bear351c reacted to this -
Okay, so here are just some photos of the engine bay, car on the dyno and the results, as well as the evolution of the engine bay.
So this is the engine bay after the car was first finished, still had points ignition, not tuned, still running it in

This is the car on the dyno, and some of the results.
As you can see, this is how I was driving the car, the throttle not opening all the way, super rich, bogging, just absolute rubbish just as the graph shows.


In this one here, this is just fixing the throttle, still no adjustments, so its amazing how much of a difference that made

And this is the engine bay now, I'll explain what I've done:
- Heat Wrapped exhaust
- Oil Cooler and Relocation Kit
- MSD 6AL-2 Programmable Box
- SS Blaster Coil
- 8.5MM Super Conductor Wires
- XF EFI Dizzy
Car hasn't been retuned, but just off the seat dyno, it has picked up at least 10KW, this is due to being able to dial in 30degrees of advance, and the ability to make my own curve through the MSD, where as the points ignition hadn't been regraphed and was just dead.
My next post will be what I'm doing with the car, and what will be happening next, as well as asking a whole lot of questions.
Thanks,
Harry
Mixalis and deankxf reacted to this -
Welcome Everyone,
So I will give a quick run down of what this is, I've read heaps of the forums on here, especially those based around performance gains on the good ol' Crossflow.
This forum, will be a kinda build topic, showing the build of the engine, specs, asking for help, giving you people information on what's happening. But most importantly, I wanted to create a forum, where I tell you guys what I'm doing, and what's going on, and you can give me specific answers and help to my issues and wants.
Yes I know, there are heaps of build threads and forums and posts about gaining performance, but I want a post and forum specifically targeted at what I'm doing, so I can gain personalised help, as well as give results and insight to what I did for future project goers.
Okay, so this is whats up, I started this build 5 years ago, and you can check it out on my other forum "Sleeping Beauty", I'm not going into detail with the build here, only engine related components.
Alrighttyyy into the nitty gritty, quick rundown, engine rebuilt, everything nearly new, entire engine is balanced internally and externally including flex plate and pulleys.
When motor was new it had a dry cranking compression of 210PSI.
This is what it is running:
- Stock OEM Cam -
.050 Duration Int = 190
.050 Duration Exh = 190
Cam Lift Int = 234
Cam Lift Exh = 234
Valve Lift Int = 407
Valve Lift Ext = 407
- 350 Holley Performance Carby
Jet Size = 52
- Redline Performance Manifold
- PaceMaker Headers
- 2 1/4 Inch Straight Pipe with Straight Through Muffler
- Unknown Compression ratio, only know 210PSI dry cranking pressure
- Converted to Unleaded Valves
- Running 98 Octance Fuel
- Mechanical Fuel Pump
- Thermo Fans
- MSD 6AL-2 Programmable Box with XF EFI dizzy and 8.5MM plug wires
Okay, so that's a run down on the motor, I ran it in over 1000kms, and god was it a bitch, this thing had like 65 jets in it from the factory Holley tune, and it had original points ignition, so it just died, bogged, sucked absolute monkey b**l.
Okay, I'll leave you guys with this last information, and will do an update in a day or so.
I got the car dyno tuned after it was run in, had massive issues, the throttle wasn't even opening to full throttle only half, and when we did our first run, without any tune, we got a powerful 40RWKW, WOOOOO hahahaha
So we fixed the throttle position, we pulled the jets straight down to 58, and then advance some timing, slowly slowly the power came up.
Eventually, we ended the day on 53 jet size, timing, and without air filter 110RWKW and about 380NM of torque, and with the air filter on I lost 10RWKW, WOW, so turns out the air filter is super restrictive.
Anyway, I'll leave you guys without for now, pretty late when I was writing this, will post some picks up with the work I just spoke about, and will then tell you what I've done next, where I am going, and ask a few questions I need help with.
Thanks,
harry
JGP and winton reacted to this -
Okay, so I'm finally back from business trip, and got a break in my UNI timetable to post some stuff up.
I want to say thankyou to all of you for your help, its been just a world of knowledge and awesomness. I haven't driven the car in a long time, and won't be driving it for a while becuase future upgrades are calling hahaha
I do have one question in regards to ignition. Now I have about 15 degrees of idle timing, is this too much?? The reason I am asking is because, on some start ups, I'll pump the pedal and it will crank and start, but on others i'll pump it, and I will be cranking and cranking and cranking, and then pump agagin and it might cough.
In other words, sometimes it starts great, sometimes its a dog to start. Any advice??
I'm going to make another thread in regards to engine problems, upgrades, help, etc.
But I'll just finish this post of with telling you guys what happened last. So like I said, I dialled the timing way advance, and created a curve, now the car runs great, I put the 58 jets in it, and the spark plugs are the perfect "tan" colour, and its awesome. So by the end of it, the car was running, running really well, and was a load of fun, its not the fastest car by any means, nor the fastest car I've driven, but with these older cars, its like it doesn't matter. Even after years of ripping my hair out and defeat, when it comes together and works, its just an amazing feeling, so thankyou all for you help with my transition from points ignition to electronic, its made the car so much better and just more amazing, it feels reliable and not like a liability.
wagoon and gerg reacted to this -
Alrightttt, today has been a long day, went to get a wheel alignment on the car, and turns out one of my sleeves has busted itself and won't tighten no matter what, so I am sourcing one of those.
In regards to whats happened with the timing, I have followed almighty and wise gerg's words, and cranked the advance all the way to 30 degress, at idle it wasn't too happy. But then I made a small curve on the MSD, got the idle at 15degrees and then basically moved it up from there.
OMG WHAT A DIFFERENCE, so basically alll the issues I said about the carb are gone, I have acceleration and power and just everything. I am so happy with it, and I thankyou so much to all you guys, especially Gerg for this awesome help.
So here is where I stand, smashing the motor around, I have slowly started cleaning the MASSIVE carbon composite on the spark plugs. Now there is still a little there, anyone can give me a reason to massive carbon build up on the plugs?? Like I know running rich can be a cause, but the motor seems to be liking high jets, and use to have massive fuel delivery issue, so it was running lean for a while.
During the day I moved the jet sizes up to 36, it made a much better difference, I can't get idle to 650rpm however, lowest I can get is 750 running smooth, and 700rpm with a bit of stumble, if I go to 650rpm idle it has massive stumble and sounds unhealthy.
Now I made my curve more elaborate, and made it pretty agreeisve, I have put the car on the dyno, so I know the where the cam kicks in and all, there is ever so slight a flat spot at low rpm and tad throttle, but it really fucking pulls. However, I have a feeling it could still be running lean, like to lean. I may be wrong, but I too it for a drive with the 36 jets, and bit of tuning on the float level, and it guns it really well, but it feels like the engine wants something.
Now I have taken into consideration my airfilter may be way to restricing on the motor, I will upload a pic of it. But i checked the spark plugs after driving it with 36 jets, there, and there was no real smell of any fuel on the plugs. this is my reasoning to running a little to lean for the motor.
My thinking is, up the jets and mofidy the curve until I can smell a little fuel on the plugs, and then back one or two jets down from there.
Keep in mind I have not changed power valve, so that may make a difference.
thank you all again for the help, the car is becoming more and more amazing.
gerg and judgetread reacted to this -
Alrightyyy, thanks for your wise words guys/girls.
Look at the current moment the engine isn't making MASSIVE power, it has about 120kw at the wheels, and I have a massive engine upgrade in progress, so I'm not going to upgrade the size of the exhuast as I just got it made. So thanks for the input slydog and ando76, but that option wil lbe done at a later stage in the cars life.
Nah, I am not going to go bi-modal, the noise isn't the issue, just the drone at idle and like cruising, I can talk in the cabin without raising my voice, but that drone slowly gives you a headache without you realising.
So i have noticed a few of you have mentioned putting the resonator at the rear?? Whats the difference between the rear and just after the extractors?? Like what difference does it have on the exhuast note??
I have a muffler at the original positing, but its real tiny, which doesn't bother me, I love the noise when you boot it, its just the drone as I said. However, the muffler is just a no brand muffler, I was looking at something like a magnaflow muffler, or a nice quality muffler of that sort, if I chose the right one, will I be able to keep my loudness or near it, but kinda refine the exhaust note and clean it up??
Thanks all for your inputs so far,
Harry


Crossflow Engine Rebuild - tips and Help (Harrison Kotrolos)
in Crossflow
Posted
1.5 Years later, I've finally had time to remove the engine and tear it down.
On holidays for the Anzac long weekend, but will post some photos and engine measurements once I'm back.
The car has done ~5,000 KMS of street and strip, revving to 5.2K regularly, from memory the ROD bearing clearances coming out of the motor are around 0.019 - 0.029mm.
Got the next version of the build planned out, it's final state made 185rwhp and 380NM torque ATW. Peak horsepower was at 5K and torque from 3 - 5K.
My goal for this next build is to fall into the 250-300 RWHP range, I would like to get the RPM to 6.5K for PEAK and hit that over and over again without fail.
To start, getting the engine entirely balanced again and block zero decked.
I have two questions: