

Jiminy Kriket
-
Content Count
212 -
Joined
-
Last visited
Posts posted by Jiminy Kriket
-
-
its why mine is now running an el computer and no afm
That and it has a cam in it.
The ISC I'm also pissed with, but have an el throttle body which I think might fit.
Don't want to hijack the thread, but was it hard to do the el ecu conversion?
-
by tan do you mean brown? i've got some second hand brown ones here that you may be able to put new seal rubber onto.
-
Yeah mate, Full set + Stoppers $50 + shipping
I should be back out stripping the car this weekend, so i could pull them off for you then.
-
Just went out the back, All 4 are clean and straight. You need the 2 plastic stoppers in each end as well?
-
Ok guys I'm after you help again I need the full set of chrome strip moulds that go on top of the doors where the weather strips are etc not the gutter moulds will be painted black so as long as there in GC no dents or twist im happy can pay via bank deposit many ppl have helped me out here hope to deal with you all one day
I'll check the trims on the ZL i'm parting out. They are the same aren't they? Same doors XD-E-F
The black paints fairly flaky on them from memory, but if you are removing that it should be fine.
-
I love finding out this stuff. Is cast iron hard on the surface due to a reaction with the sand ie becomes a silicone alloy or somehow turns into a carbon steel?
I heard they swapped sides with the clutch fork on S2 XF to get the clutch cable and boot away from the cat that runs down that side
Exactly right Gerg. The genuine XF T5 bell housings have the long clutch cable and passenger side throw out lever. And yeah, the outer layer gets glass hard deposits in it from the moulding material normally. On really good sand castings it doesn't happen because they preheat the sand moulds to prevent inclusions. With cast iron, the quicker the cast cools the harder the material gets. That's another reason you can get a hard skin on the cast iron is rapid cooling of the outer layer and slower cooling of the inner.
Happy to give info from one fitter machinist to another
Well, that explains the 9" mix and matchery i saw in the other thread. Sometimes you need to think outside the box to make things work the way you want.
gerg and Thom reacted to this -
Yeah, Fitter Machinist by trade Gerg. AS far as the cast iron goes, it has a really hard surface (normal for a sand casting to have some hard areas on the surface) but once you are under it it normally machines really nice. Just gotta make that first cut a nice easy one to get rid of the hard skin.
As far as the closeness of those bolt holes, top passenger side is has about 3.5mm of material between the peaks of the threads and the drives side around 2.5mm. Not a problem so far. The only problem i had was on my first personal bell housing, i didn't have a clue what i was doing and ended up trying to weld a lug straight to the rough cast outer. Lets just say that the cracks appeared while i was fitting. Wasn't happy. thought about it a bit mnor and came up with this process which hasn't failed me yet.
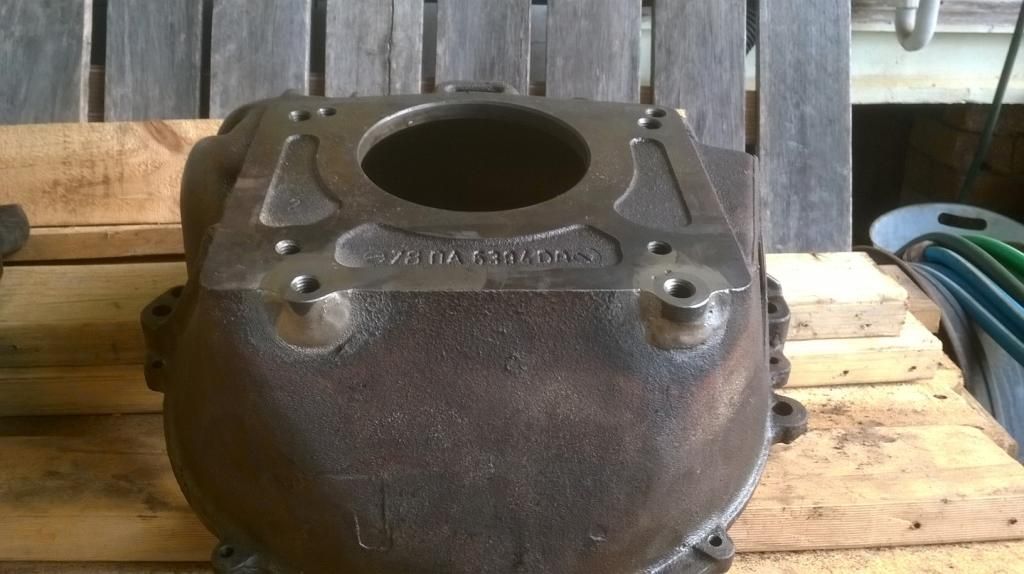
This is the bell housing that Nath-25 will receive, it came out of my dads fairlane.
Thanks for the info Thom. I'll try to keep a look out for them now.
gerg reacted to this -
Little bit of an idea about how i do these bell housing conversions.
First thing i do is skim the nose cone of the gearbox down to suit the bell housing and while i have it off i change the front bearing and seal.
Second, i reassemble the gearbox and put it onto the bell housing than transfer punch the hole locations. A transfer punch is a bit of high tensile steel that is machine accurate size to the hole with a point machined centrally on the leading end, just like a centre punch.
Third, i take it to the milling machine and using a slot drill, plunge a 25mm hole centrally on the 2 lower positions, leaving a slight shoulder on the bores.
Fourth, I grind a weld prep around the edge of the 25mm holes then i ut some pieces of 25mm diameter bright mild steel and place it into the holes. I leave 1-2mm proud of the surface.
Fifth, I put the bell housing on a 4 ring lpg burner and walk away for about 45 minutes.
Sixth, I use a process called metal spray welding to bone the slugs in place. Metal spray welding uses an oxy acetylene set with a special ($4000 special) gun that has a hopper arrangement on it to feed a nickel based weld powder directly into the oxy flame.
Seventh, Leave the bell housing on the burner for another 45 minutes, but turn the outer ring off. This is what's called a post heat and slowly lets the bell housing cool off.
Eighth, once cooled i take it to the mill and bolt it engine side down onto the bed. I then machine the 2 slugs and any weld protruding above the face down level with the gear box mounting face.
Deburr and bolt together. I've done 8 conversions this way, and am yet to have one fail. Your process is excellent for a home based job Gerg, this is just they way i like to do them. Having access to the expensive gear makes it nice too.
On which bell housing to use, the bell housing i the picture is a 78DA part number. So i am guessing XD-E single rail housing. It needed the 2 extra lugs in the bottom. But i have done a couple at work where the bell housing actually extended far enough below that edge to get the bolts in no worries, just wish i had bothered to note the casting numbers at the time.
Just thought i would throw another option out there for all to see.
steve mcqueen and gerg reacted to this -
Quickest way to sharpen up my BTR in my au was to take the 350k old filter and oil out of it and put some nice red stuff in instead of the black tar that came out of it.
Gonna have to refresh the oil a few more times though, took it for a run and the oil in the converter turned everything black again.
-
My experience with the EFI 250 is that the slightest little vac leak means the engine won't want to idle properly. My old man's zl needed the vac lines replacing, the rear engine seal, intake gaskets and the rocker cover gasket doing, and it still has a minor fluctuation while in gear. The idle control valve at the back of the rocker cover can sometimes get a build up of crud in it and need cleaning, and while you're in there replace the o ring for some insurance.
On the pinging issue, what year model zl? is it the leaded EFI or unleaded EFI version. The unleaded version has a knock sensor and is a little more tolerant of lower octane fuels. The leaded EFI motor, which my dad has, didn't get the knock sensor. Makes it real touchy to timing and fuel octane rating. He's gotta run 95 minimum just to keep the thing from rattling it's head off.
I think i've covered everything we've done so far. If not, i'm sure someone else will chime in.
Clevo120Y reacted to this -
The solder appears to have wicked itself all the way around, so the strength should be top notch.
The only thing that may let it down would be the silver solder being only the 15% variety, but if the
wheel studs where staked in like in a wheel hub, the solder is just there as a bit of irish engineering (To be sure to be sure)
Looks the goods. Always good to see how other people get through this sort of mod.
gerg reacted to this -
So, the solder flowed nicely? Looks like it worked a treat.
Could we get a close up of the solder joint from the gearbox face?
-
Hey all, Trying to sort out a problem my sister's Series 1 AU has developed and they can't reregister without rectifying the problem.
So it goes like this, the air bag warning light flashes constantly. With a little reading and googling i found that the flashing was the code 33, or Passenger Air bag Open Circuit or High Resistance. This series 1 au didn't come with a passenger side air bag, so a little more reading and I found that it could be as simple as the dummy resistor in the harness could've fallen out.
So question time.
1. Where do I find the part of the harness in the au that the passenger air bag is meant to be plugged into?
2. Do I have to remove the dash to find it?
3. How do I clear the error code flashing on the dash?
Other on dash problem, it has the service spanner up on the dash, but no matter how long you push the reset button for it won't clear. Possible reasons for this would help greatly.
Thanks for reading.
-
Sounds the goods. Just be careful with the coals temp... They can get hotter than you would think.
Don't forget photos... I always like learning new ways of doing things.
-
The holes are threaded, yes? You could get away with silver soldering threaded rod in there and then redrilling the pattern to suit.
The biggest problem you are going to have soldering or brazing the plug in Gerg is getting the bell housing clean enough down the threads before you
apply the solder or braze. Silver soldering would be preferred because there is a lot less heat involved in melting the solder. Silver solder is also
strong as hell when used this way. Just make sure you get the high silver percentage solder, not the plumbers solder. The higher percentage solder has
a higher bond strength.
The only steel bell housings i have seen are the pressed metal jobbies sold for drag racing applications like a lakewood and the like.
Other than that, you only have cast iron and aluminium as options for stock bell housings.
And on a general note on welding/brazing/soldering cast iron, preheat is your friend. Get it hot enough so it's "smoking" before you try to do any repairs.
At work i use a 4 ring camp burner to preheat larger castings But at home, if it fits and the wife isn't home, into the oven at 150 for about half an hour before
I weld then back into the oven for another 20 minutes after I finish at 150, then leave it in the oven to cool off. This just stops any possible heat spikes that
may harden the cast iron or worst case scenario crack the housing.
-
Hi, first post but I hope I can help.
I'm a fitter/machinist by trade and in the past 5 or so years have converted 6 bell housings to suit the T5 gearbox bell housing.
Fist things first, is there enough material at the bottom of the bell housing to catch the bottom 2 holes on the gearbox?
If not, there needs to be a couple of bosses welded onto the bottom of the housing to get the holes in the right place.
Second, do you have any holes interfering with the holes for the T5 bolt pattern?
If there are overlapping holes, my fix for this is metal spraying up the original holes. Metal spray is an oxy acetylene welding process
that doesn't cause the same hardness or warping issues that stick welding can cause.
Thirdly, Does the locating diameter on the T5 snout fit neatly into the bell housing already?
If it's too loose, the snout will need to be sleeved to fit. If it is too small for the snout to fit, the easiest fix is to skim the location diameter
on the snout down to suit the bell housing. You can bore out the bell housing to suit, but it takes longer set up.
Once you have all the necessary lugs and available material for the bolt pattern, it's simply a case of drilling and tapping to suit.
The cars I've converted include my 302 windsor powered xy, and 4 crossflows in xes and xfs. Biggest problem I found
was that the bell housings started to taper too high up and you couldn't physically get the bottom 2 bolt onto a flat surface, but as I said,
I have worked around that issue.
Hope this helps, if you have any questions on the welding process, just ask.
XES and gerg reacted to this

Door Seals
in Body and Exterior
Posted
Yep, places like clarks rubber or some upholstery shops could supply or at least point you in the right direction.