
Leaderboard


Popular Content
Showing content with the highest reputation since 07/06/2019 in all areas
-
9 points

Darkside Garage Inc. Interior
Slow250XC and 8 others reacted to Hawksam67 for a post in a topic
I have been busy working away on the interior of the Darkside Garage Inc. Millennium Falcon Longreach. Still heaps to do. -
9 points

Panko's Mk1 Escort (Round 2)
FORD_MAN and 8 others reacted to Panko for a post in a topic
I had the day off work today, so spent the day on the Escort, and it just got better and better as the day went on I started the day by getting the 1600 bottom end back together. Once that was done, I dropped the flywheel off to be machined ready for the new clutch. Then spent the afternoon with Rod working on the gearbox. We nearly finished making up the jig to weld the shifter in its new location. We have basically set this jig up so that this conversion can be done with or without the need of the entire gearbox, but rather just the extension housing and shifter rod. Now, for the moment we have all been waiting for (or at least i have )..... IT'S IN COLOUR! I haven't seen the car yet in the flesh. these are just photos that Mark has sent me. The front still needs to be blacked out behind the grill. -
8 points
Panko's Mk1 Escort (Round 2)
Mr Polson and 7 others reacted to Panko for a post in a topic
Big day today. The Escort is home at last Covered in dust First time washing it since December 2020 *not me in the photo* all nice and clean at last. ready to go into its new home. this is how you clean the inside, right? its fine, there is no interior at the moment Engine bay looks so pretty In it's new home. the shed is a little squishy with the car running this way across the shed, but once i get some shelving into the shed and a bit more storage ill have space to move. -
8 pointsMark sent these through today. Bonnet and grill fitted and aligned. This makes me smile seeing it look a little more like a car again
-
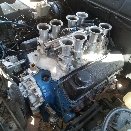
8 points

New Motor for Rods Mad Maxy Ute
Mr Polson and 7 others reacted to motoSycho for a post in a topic
It's in!!!!! Now to hook everything up. -
8 points

Injector leak testing
Gravelrash and 7 others reacted to SPArKy_Dave for a post in a topic
Found a safe DIY method, for basic leak testing of Injectors - Connect compressed air, set at normal fuel pump supply pressure (often 40-60 psi) Leave for a few hrs, and results should show. -
7 points
Did the machine shop make a mistake?
hucklburry and 6 others reacted to Thom for a post in a topic
Pre crossflow use the same cam bearings as xflow, its an extra hole for the pre xflow to oil the rockers as they have an extra oil gallery to supply oil to the head and rocker shaft, that gallery gets supplied from the top of the cam journals, whereas xflow use the lifters and pushrods to supply the rockers with oil, its no real biggie just interchangeable bearings -
7 points

First time since 1989...
omgwizards and 6 others reacted to IVC434 for a post in a topic
Well, last Saturday was an epic day and has given me and my mate confidence and inspiration to push on harder than ever with the restoration of Granddad's old XC... After liberally lubricating each cylinder and leaving it for a week, we gently turned her over by hand. There were NO tight spots, weird sounds or unwanted friction at all and she turned beautifully... Battery was connected and carby was primed and after about 6 attempts, she briefly coughed and died... A few more attempts were made until, incredibly, the super fuel that was still in her tank (no, it HASN'T gone off at all) made it to the fuel pump and she ran long enough for me to get this very quick video. Pretty much a testament to the strength and engineering of the mighty crossflow engine... -
7 pointsmore progress on the car. Back panel is in, but not welded. just getting things all setup before being welded in. more little imperfections being sorted out. factory creases from panel and body joins being smoothed. tonight after hours, we made a start on the underside of the car. got most of it done and prepped. (this was after only a short amount of time) Awaiting a conclusion as to how far Mark wants me to take the underside. Or rather, how far I think I should go with the underside of the car. given we got so much of it cleaned and back to bare metal tonight, id imagine another solid day and it will be ready to go underneath.
-
7 points

Boingk's F250 4x4
351XD_Fairmont and 6 others reacted to Boingk for a post in a topic
Evening all. I picked this up today. Let me know if the pics don't work. She's an early dentside F250 4x4, commonly called the 'Highboy' option. She has a 351C and manual trans, lots of rust in the floors and a fairly clean engine compartment. -
7 pointsI have news on the Escort. Quicker than I expected, but I have an answer from Shannons. The bad (but not so bad) news is that it is a write off The good news outweighs the bad. What I didn't realise is, that Mark, from the start, had quoted in such a way, that the cost sounded correct, and appeared correct to Shannons assessor, but also in such a way that they would write it off. Now in most cases, that would be bad. that the repairer has made the insurance company write a car off, but not in my case. Shannons will write the car off, and pay me out 100% of what it is insured for. Due to being older than 35 years of age, there is no salvage fee, so I get to keep the car, and its entire insured value. Working off Mark's quote, this means I will have around $3000 to spare, to go towards the cost of the chrome trim repairs, and the extra paint work. Depending on the cost of the extra paint work, i may also pay to have the wheels painted professionally, and, it has been suggested to me that I pull the engine out, and have the engine bay done at the same time. Which is looking like a pretty good idea to me. With the extra $3k up my sleeve, to get a full respray, including engine bay, i may not be too far out of pocket, if any, unlike with the XF, where I was a long way out of pocket. Im not sure about other states, but here in victoria, anything that is older than 25 years old, written off cars do not go onto the WOVR, which means the rego never gets cancelled, and they do not need an engineers certificate, or roadworthy to be put back on the road. So yes the car is a write off, but it actually works out better for me than if Shannons decided not to write it off, and repair it.
-
7 points

Ford 300ci Inline 6
Fingers and 6 others reacted to Gary Palmer for a post in a topic
This thread is quite old, but it caught my attention. I have a 300ci factory EFI six in my 1971 F100. I transplanted it in 1998 - ousting the original 240. It's a 4.9 litre, 4" bore with 3.98" stroke. Armour guard brought 6 into Queensland during Expo in '88. They were fitted into F250's. 4 were ultimately crushed would you believe? Two survived - I have one and I believe the other went to a South Australian farmer who removed the EFI. Just though that may be of interest to some. Cheers. -
7 points
Panel Van Interior Builds
gregaust and 6 others reacted to Hawksam67 for a post in a topic
I have been busy with a new direction on the interior still star wars themed but more Millennium Falcon. cheers Scott -
6 points
XC/XD/XE Brake Booster REBUILD TUTORIAL
IVC434 and 5 others reacted to SPArKy_Dave for a post in a topic
I stumbled upon an old Brake Booster rebuild tutorial thread, over on the Ford Australia Forums, and thought it well worthy of adding to our Archives... Here's a summary of the rubber components (with pricing), used in the below rebuild - VH2013 - Reaction Disc - $6.60 VH2015 - Front Seal - $5.41 VH2029 - Rear Seal - $26.40 VH2579 - Main Diaphragm - $31.33 VH2580 - Main Diaphragm - $39.60 VH2581 - Seal - $21.12 VH2582 - Seal - The complete XC/XD/XE brake booster assembly part no. is/was VH395 For further info, see the following link to another excellent rebuild tutorial we have, created by fellow OzFalcon member 'jca4'. Full credit for the following write-up, goes to Wayne (aka XC GXL on Ford Forums). _______________________________________________________________________________________________ Some of us live overseas with these beauties and when something goes wrong we either have to spend a truck load on postage (and sometimes extra TAX) or we improvise with what is available to get our cars back on the road. Well I had a brake booster failure a little while back and fortunately I had a decent spare however I looked into getting a spare sent over and the cost of a reconditioned one including postage was frightening. I was fortunate enough to meet a bloke in Wollongong before I left in the brake and clutch business as I got some bits and pieces for the XC before I left home. When the booster failed I rang him and he was kind enough to send me over all of the major parts to recondition an XC/XD/XE brake booster. Here is an exploded view showing the parts I replaced. and here are a few photos of the replacement parts I decided to try to tackle a rebuild although I have never done so before and was a little daunted by it initially like how to spilt it, replacing diaphragms etc, etc. Well I managed to overhaul 3 that I had which were knackered with success. So for all of you guys living overseas and those of you who want to overhaul your own booster this is how I did it. Firstly I made up a jig to enable me to split the booster as the top section needs to be twisted from the lower section and can take a bit of force. The jig looks a little Heath Robinson but it worked a treat for me. Once the top is split the M20 rod, which incidentally is 500mm long with a 13mm hole 70mm deep drilled into each end to enable the plate to not foul with the Rod and Valve Assy (Part no 2377), is wound back to enable the spring to be detensioned safely. This part is really necessary during reassembly as trying to hold the spring down while trying to locate the top to the bottom is difficult. Remove the Rod and Valve Assy (2377). This is the one from a 38 year old car and needs a good clean. This is from a 38 year old XC and was a little worse for wear. I only used WD40 and wire wool to clean all these parts. Disassembled. All that is needed for this is a strip down, clean and reassemble. Make sure that the little piston is removed and cleaned and the reaction disc (Part No 2414 from drawing and replacement part no VH2013) replaced and that the piston is free to move. Once this is split the main diaphragm assembly can be removed from the housings. Again this takes a bit of force as the whole assembly needs to be pushed from the lower seal. This is how they look once removed. Any wonder the brakes were a little odd! To remove the pedal to booster assemble simply remove the circlip and the whole rod pushes out. To remove the diaphragms you will need a small flat blunt screwdriver as the diaphragms are sandwiched between the Valve Body (Part No 2391) and the Diaphragm Plates (Part No’s 2395A, 2395B and 2395C). Take note of the disassemble sequence although the assembly can only go one way when reassembling. here is the assembly without the diaphragms Remove the rear seal from the main housing. This is not shown clearly on the Ford exploded view but is replacement part No VH2029. I then cleaned the whole lot up with wire wool, soapy water and some fine wet and dry. Replace all the diaphragms (replacement part No’s 2A365B = 2579 and 2A365A = 2588). This requires a little silicone grease around the inner lip of the diaphragm and then just force (using hands only) the diaphragm between the diaphragm plate and the Valve Body. It takes some effort but goes eventually. Do this for both Diapragms. Make sure that the diaphragm 2A365B (2579) is pushed up around the outer lip on 2395B as this allows the vacuum to be formed when in use. This is a final assembled unit. Also when the whole assembly is put back into the main housing make sure that the top diaphragms 2A365A is (2588) outer edge is below the retaining indents to enable a seal between the housing and the diaphragm plate 2395B. I then just put the whole part assembly back into the jig compressed the top housing and spring and then tapped the top cover around using a soft hammer and the plate that I made to go over the master cylinder mounting studs. I managed to do one in about 1 hour including cleaning. It is a pretty simple job really if you have the right set up. If there is anything I didn't describe well please let me know and I'll only be too happy to help where I can. Wayne -
6 pointsOkay so I ended up with 30-thou ring end gaps due to pre-gapped rings but what the hell, thats way better than the 120+ I had to start with, and with 11:1, worked heads, camshaft and possible nitrous use thats probably not a bad place to be. The whole shortblock is together and torqued to spec with new bearings and oil pump, the sump/timing set/water pump go on next and then I'll chuck it back in the truck before I put heads on it.